PirateDiffusion Guide
Pirate Diffusion
Is there a Checkpoint, Embedding, LoRA, or other model that you want preloaded? Request a model install
- Overview
- Fundamentals
- Commands
- Feedback
![]()
Overview
Pirate Diffusion by Graydient AI is the most powerful bot on Telegram. It is a multi-modal bot, meaning that it handles large language models like DeepSeek and Llama 3.3, tens of thousands of image models like HiDream, Chroma, FLUX, Stable Diffusion 3.5, AuraFlow, Pony, and SDXL and also video models like Wan, Hunyuan and LightTricks (LTX).
Incredible Value
Unlike other generative AI services, there are no “tokens” or “credits” required. PirateDiffusion is designed for unlimited use, royalty free, and it’s bundled with Graydient’s webUI.
Why use a bot?
It’s extremely fast and lightweight on mobile, and you can use it solo or in groups of strangers or with friends. Our community is making chat macros for powerfuly ComfyUI workflows, so you get the full benefit of a desktop rendering result from a simple chat bot. It’s insane.
What else can it do?
Images, Video, and LLM chats. It can do just about anything.
You can make 4k images in a few keystrokes without a GUI. You can use every major Stable Diffusion via chat. Some features require a visual interface, and it pops up a web page for those (Unified WebUI integration)
Create by yourself with your private bot, or join groups and see what other people are making. You can also create themed bots like /animebot which connect our PollyGPT LLMs to StableDiffusion models, and chat with them to help you create! Create a workflow that’s totally unique to you using loadouts, recipe (macros) widgets (visual gui builder) and custom bots. It does a lot!
Origin Story
The name Pirate Diffusion comes from the leaked Stable Diffusion 1.5 model in October 2022, which was open sourced. We built the first Stable Diffusion bot on Telegram and thousands of people showed up, and that’s how we started. But to be perfectly clear: there’s no piracy going on here, we just loved the name. Still, enough people (and our bank) said the name was a little much, so we renamed our company to “Graydient” but we love Pirate Diffusion. It attracts fun, interesting people.
Unlimited video geneneration is here for Plus members!
If you’re a member of Graydient’s Video Plan, there are various video workflows that you can use. There are two general categories of video workflows: turning a prompt into a video, and turning an existing photo into a video. (In the future, we aim to add video-to-video. This isn’t available yet.)
Text to music – two modes!
/makesong Write a song about being in the face by a California Rattlesnake. Incorporate "dirty sanchez" and "Roosevelt Hoover"

/workflow /run:music-ace [verse] gonna make some songs [bridge] gonna make em [chorus] with pirate diffusion yeah!
Text to video
- WAN 2.1 – the current top open source video model, write a simple prompt and it happens! WAN appears to have better prompt adhesion and animation than HunYuan, but worse anatomy
- Boringvideo – creates lifelike ordinary videos that look like they came from an iPhone
- HunYuan – three types, look at the bottom of the workflow page to find them. Hunyuan creates the most realistic videos. The higher the “Q” number the greater the quality is, but the shorter the videos are.
- Video – the ones simply called Video use LTX Lighttricks, great for 3D cartoons
/wf /run:video-hunylora-q8 cinematic low angle video of a ronald mcdonald clown eating a square hamburger, the restaurant ((sign text says "Wendys")), ronald mcdonald's clown costume has red afro hair and a red nose with white face paint, the restaurant is brown, the burger is pointy and square, the background has blur bokeh and people are walking around
PirateDiffusion supports Hunyuan and LightTricks / LTX videos and loras! We are adding multiple video models and you can use them unlimited as part of our service, along with unlimited image and unlimited lora training.
In LTX, the structure of the prompt matters a lot. A short prompt will result in a static image. A prompt with too many actions and instructions will cause the video to pan to different random rooms or characters.
- First describe what the camera is doing or who its following. For example, a low angle camera zoom, an overhead camera, a slow pan, zooming out or away, etc.
- Next describe the subject and one action they are performing onto what or whom. This part takes practice! In the example above, notice that Ronald eating the burger came after the camera and scene setup
- Describe the scene. This helps the AI “segment” the things that you want to see. So in our example, we describe the clown costume and background.
- Give supporting reference material. For example, say “This looks like a scene from a movie or TV show”
- You can specify a lora to control the art direction or character likeness. Add this to the end of the prompt like <move-enhancer-huny>
Image to video
You can upload a photo and turn it into a video. There isn’t just one command – look at the “animate” workflow series to use different kinds of AI models. Try different models and prompt strategies to find the one that works best for your project, or look in the PLAYROOM channel in PirateDiffusion to see what others have created with them.
The aspect ratio of the video will be determined by the image that you upload, so please crop it accordingly.
To do this, first paste the photo into the chat and click “Reply” as if you’re going to talk to the photo, and then give it a command like this:
/wf /run:animate-wan21 a woman makes silly faces towards the camera/wf /run:animate-skyreels camera video that slightly changes the angle, focused on a lovely girl smiling and looking at the camera, she looks curious and confident while maintaining eyes on the viewer, her hair is parted, she sits in front of a bookshelf and peeping gremlin eyes behind her, she is relaxing vibeWe host open source AI models for image-to-video. The two most popular are:
animate-skyreels = convert an image to video using HunYuan realistic videos
animate-ltx90 = uses the LightTricks model. Best for 3D cartoons and cinematic video
Special parameters:
/slot1 = length of the video in frames. Safe settings are 89, 97, 105, 113, 121, 137, 153, 185, 201, 225, 241, 257. More is possible but unstable
/slot2 = frames per second. 24 is recommended. Turbo workflows run at 18 fps but can be changed. above 24 is cinematic, 30fps looks more realistic. 60fps is possible at low frames but it looks like chipmunk speed.
Limitations:
- You must be a member of Graydient Plus to create videos
- Many video samples are available in the VIP and Playroom channel today. Come hang out and send us your prompt ideas while we put the finishing touches on video.
Previous / Changelog:
- Added Wan 2.1 and Skyreels. Use /workflow /show: to inspect the parameters of both
- Added new Flux workflows like ur4 (ultra realistic 4) and bento-flux (Bento TWO model)
- Added Hunyuan and LightTricks / LTX videos with lora support
- Added Llama 3.3 and many more LLMs, type the //lm command to browse them
- You can use up to six Flux loras with certain Flux workflows now
- An HD Anime Illustrious workflow was added. Crisp!
- Flux Redux, Flux Controlnet Depth, and so many new workflows are now available
- Better outpainting! Try replying to a picture with /zoomout-flux
- Better LoRamaker Integration. Use /makelora to create a private lora in your web browser, and then use it in Telegram within minutes
- New LLM* command. Type /llm followed by any question. It’s currently powered by the 70 billion parameter Llama 3 model, and it’s fast! We don’t censor your prompts, however the model itself may have some of its own railguards. *LLM is short for “Large Language Model”, as in chat models similar to ChatGPT.
- Many FLUX checkpoints are here. Type /workflows to explore them and get their commands. Also new: a shortcut for workflows is /wf. Video tutorial
- More models, over 10,000! Try the new Juggernaut 9 Lightning, it’s faster than Juggernaut X. You can also use it by just adding this hashtag: #jugg9
- Florence computer vision model added – Upload any photo and type /describe /florence to get a detailed vivid prompt description to use with your workflows
- Custom bots can now retain memories. See “memories” in the PollyGPT tutorial
- Better render monitoring! Type /monitor to pop it up, it’s a little web page. If your city’s Telegram servers are busy or offline, the images can be picked up from our Cloud Drive much faster!
- New Bots! Try: /xtralargebot /animebot /lightningbot and chatty bots like /kimmybot /angelinabot /nicolebot /senseibot
- Plus plan members can now choose Llama3 70 billion parameter for their bots
- New Recipes: Try #quick for fast HD images, or #quickp for portraits, #quickw for wide
- Polly Updated! – Use /polly to chat with the bot, and right-click reply to converse
- Polly also now only uses the models that you mark favorite in My Models
- The new /unified command sends images to Stable2go for web editing
- The new /bots command – customize Polly to your taste, LLM + image models!
Up next?
Suggest a feature and upvote others’ ideas.
See what’s next in our roadmap and what just arrived in our changelog.

Premade & custom bots
BASICS: The LLM command
/llm who would win a fight between a pacifist tiger with a shotgun or a thousand angry penguins parachuting above with forks and knives?
Type /llm (like LLM, large language model) and ask a question, similar to ChatGPT. It’s powered by the 70 billion parameter Llama3 model.
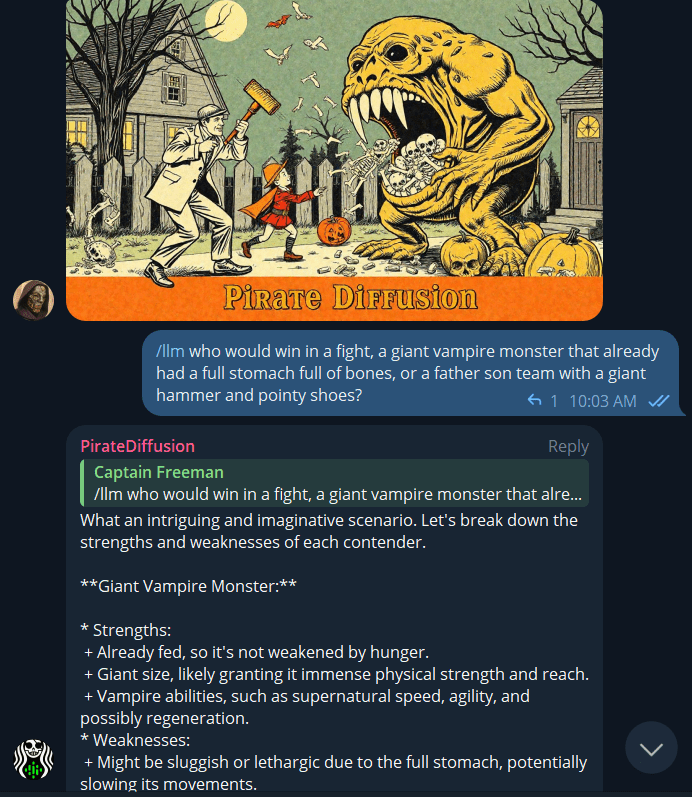
CREATE YOUR OWN LLM AGENT
To switch to another model and personalize an alternative chatbot character, login to my.graydient.ai and click on chatbots to choose other LLMs like Mixtral and Wizard
Introducing “POLLY”
Polly is one of the characters within PirateDiffusion that talks and create images. Try it:
One you are in the @piratediffusion_bot you can talk to Polly like this:
/polly a silly policeman investigates a donut factory
You can also use it from your web browser by logging into my.graydient.ai and clicking the Chat Bots icon.

INTRO TO CUSTOM BOTS
Polly is just one of the many characters created by our community. To see a list of other public characters, type:
/bots
To create a new one, type
/bots /new
This will launch PollyGPT in your web browser to train your own character, which can later be accessed as a character within your @piratediffusion_bot.
EXPLORING CUSTOM BOTS
The AI community is full of many interesting creators. Some are open-sourcing large language models (alternatives to ChatGPT) as well as open source image models (alternatives to DALLE and MJ). Our original software bridges both of those things together into an easy to use “bot” maker within Telegram or over the web. Visit our Polly GPT docs – now with memories! page for more information and templates to create your own bots.
Activating your bot
A Graydient account and a (free) Telegram account are required to use PirateDiffusion. Set it up
Need help with your bot? Stuck in free mode? Contact us

Account Basics
NEW USER
/start
HOW TO GET STARTED
Log into my.graydient.ai and find the Setup icon in the dashboard, and follow the instructions.
If you need help, hit up our support channel
/email [email protected]
If you have upgraded your account on Patreon, your email and Patreon emails must match. If you cannot activate and unlock all features, please type /debug and send that number
USERNAME
/username Tiny Dancer
The bot will use your Telegram name as your public community username (shown in places like recipes, featured images). You can change this at any time with the /username command, like this:WEBUI and PASSWORDPirateDiffusion comes with a website companion for operations that are tricky to do, like organizing your files and inpainting. To access your archive, type:
/webui
It is private by default. To set your password, use a command like this
/community /password:My-Super-Secure-Password123@#$%@#$
To disable a password, type
/community /password:none
What makes a good prompt?
A prompt is a complete description that tells the AI what image to generate:
- Should it be realistic? A type of artwork?
- Describe the time of day, point of view and lighting
- Describe the subject well and their actions
- Describe the location last, and other details
Basic Example:
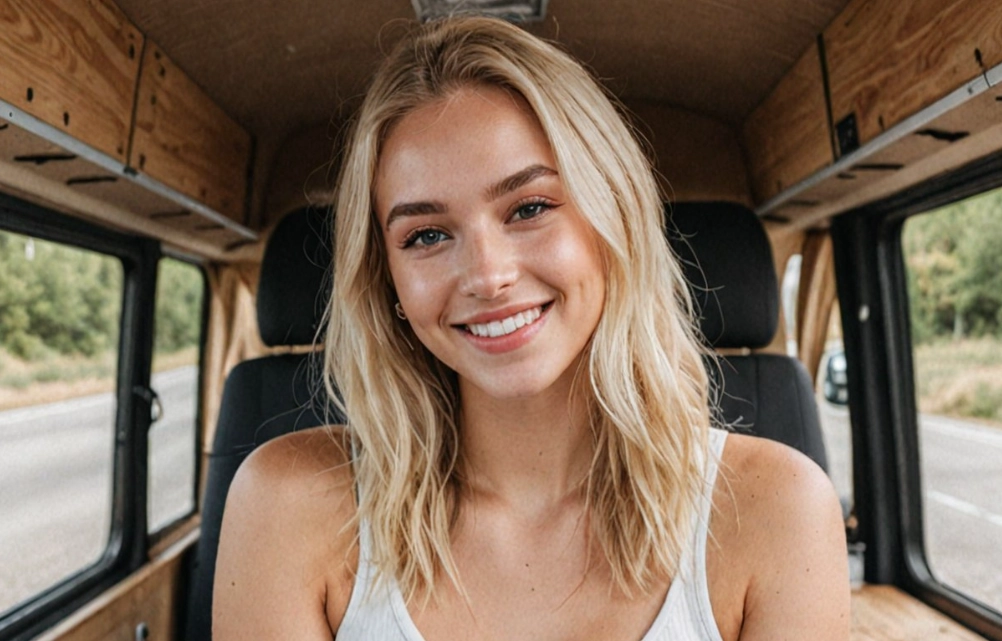
a 25 year old blonde woman, Instagram influencer, living the travel van lifestyle
Quick Prompt Tips
1. Always describe the whole picture, every time
A prompt is not a chat message, meaning it is not a multi-turn conversation. Each prompt is a brand new turn at the system, forgetting everything that was typed the previous turn. For example, if we prompt “a dog in a costume”, we will certainly get it. This prompt completely describes a photo. If we only prompt “make it red” (incomplete idea) we won’t see the dog at all because “it” was not carried over, so the prompt will be misunderstood. Always present the full instruction.
2. The word order matters
Place the most important words at the start of the prompt. If you’re creating a portrait, place the person’s appearance first and what they are wearing, followed by what and where they are as the least important details.
3. Length also matters
The words at the start are the most important, and each word towards the end gets less and less attention – up to roughly 77 “tokens” or instructions. However, you should know that each AI concept in our system is trained on different subject matter, so choosing the right concept will impact how well you are understood. It’s best to keep things to the point and learn the concepts system below) instead of writing long prompts for the highest quality results.
Positive Prompts
Positive prompts and Negative prompts are words that tell the AI about what we do and don’t want to see. Humans don’t typically communicate in such a binary form, but in a very noisy environment we might say “this, but that!”
Positive: A daytime beach scene with a clear blue sand, palm trees
Negative: People, Boats, Bikinis, NSFW
This entered in the two boxes of the Stable2go editor, like this:
Positive prompts contain the subject and supporting details of the image. It helps to describe the art style and surroundings, as well as your expectations of aesthetics. Examples:
- best quality realistic photo of a puppy
- masterpiece drawing of a sunflower, bokeh background
- low angle photo of a scooter in a driveway, watercolors
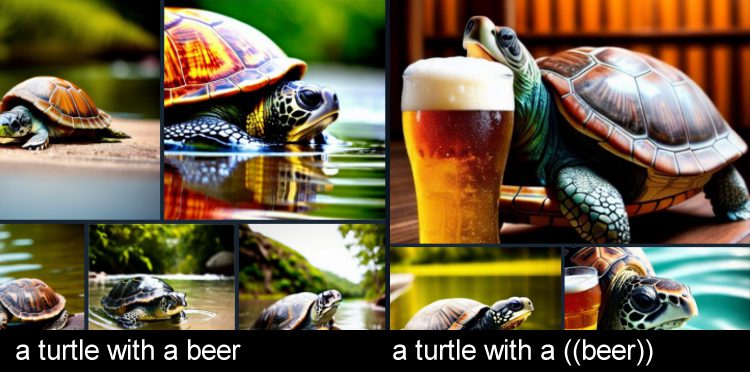
- a turtle with a ((beer))
Making positives more powerful
To add more emphasis to certain words, add nested parenthesis. This increases their factor by 1.1x.
In the example above, we are saying that “turtle” is the subject, because it appears at the start of the prompt, but the beer is just as important even though it came later in the prompt. When creating unlikely situations, extra emphasis helps.
Negative Prompts
Negatives describe what you do not want in the image.
If you want a Seamonster but not the sea, the monster is your Positive and Ocean is your Negative.
Negatives can also encourage photo quality, by discouraging extra limbs, low resolution, etc.
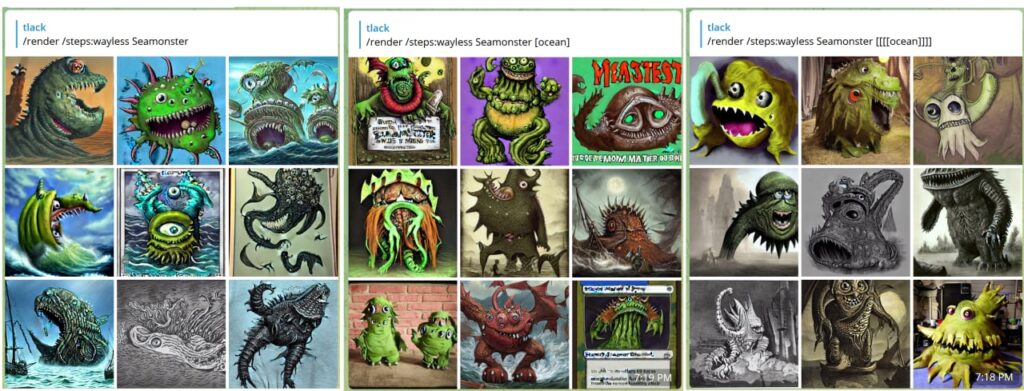
- (give me what I want) [but, not, these, things]
- (pretty cat) best quality [[[ugly cat, low resolution, low quality]]]
- one dog (terrier, puppy) but not a [cat, kitten, furball, Garfield]
- you can also call a negative concept [[<fastnegative-xl>]]
Pro commands
Create images like a stable diffusion pro with these params:
RENDER
If you don’t want prompt-writing help from Polly or your custom bots, switch to the /render command to go fully manual. Try a quick lesson.
/render a close-up photo of a gorilla jogging in the park <sdxl>
The trigger word <sdxl> refers to a concept
INLINE POSITIVES, NEGATIVES
Positives tell the AI what to emphasize. This is expressed with (round brackets). Each pair of brackets represents a 1.1x multiple of positive reinforcement. Negatives do the opposite, using [square] brackets.
/render <sdxl>
((high quality, masterpiece, masterwork))   [[low resolution, worst quality, blurry, mediocre, bad art, deformed, disfigured, elongated, disproportionate, anatomically incorrect, unrealistic proportions, mutant, mutated, melted, abstract, surrealism, sloppy, crooked]]
Takoyaki on a plate
Adding too many brackets may limit how much the AI can fill in, so if you are seeing glitches in your image, try reducing the number of brackets and inversions.
Tip: How to make quick prompt edits:
After a prompt is submited, recall it quickly by pressing the UP arrow from Telegram Desktop. Or single-tap the echoed prompt confirmation that appears in an alt font. Word order matters. Put the most important words towards the front of your prompt for best results: Camera Angle, Who, What, Where.
TRANSLATE
Do you prefer to prompt in a different language? You can render images in over 50 languages, like this:
/render /translate un perro muy guapo <sdxl>
It’s not required to specify which language, it just knows. When using translate, avoid using slang. If the AI didn’t understand your prompt, try rephrasing it in more obvious terms.
Translation Limitations
Some regional slang may be misunderstood, so prompt as literally and by the book as possible when using the translation feature. For example, “cubito de hielo” could mean small ice cube or a small pail bucket of ice in Spanish, depending on the region and contextual nuance.
To be fair, this can also happen in English as the AI can take things too literally. For example, one user requested a polar bear hunting, and it gave it a sniper rifle. Malicious compliance!
To avoid this from happening, use multiple words in your positive and negative prompt.
RECIPE MACROS
Recipes are prompt templates. A recipe can contain tokens, samplers, models, textual inversions, and more. This is a real time saver, and worth learning if you find yourself repeating the same things in your prompt over and over.
When we introduced negative inversions , many asked “why aren’t these turned on by default?”, and the answer is control — everyone likes slightly different settings. Our solution to this was recipes: hashtags that summon prompt templates.
To see a list of them, type /recipes or browse them on our website: the master list of prompt templates
/recipes
Most recipes were created by the community, and may change at any time as they are managed by their respective owners. A prompt is intended to have only 1 recipe, or things can get weird.
There are two ways to use a recipe. You can call it by it’s name using a hashtag, like the “quick” recipe:
/render a cool dog #quick
Some popular recipes are #nfix and #eggs and #boost and #everythingbad and #sdxlreal.
Important: When creating a recipe, it’s required to add $prompt somewhere in your positive prompt area, or the recipe can’t accept your text input. You can drop that in anywhere, it’s flexible.
In the “other commands” field, you can stack other quality-boosting parameters below.
COMPOSE
Compose allows multi-prompt, multi-regional creation. It works best by specifying large canvas sizes and 1 image at a time.The available zones are: background, bottom, bottomcenter, bottomleft, bottomright, center, left, right, top, topcenter, topleft, topright. The format for each zone is x1, y1, x2, y2
/compose /size:2000x700 /left:The tower of Thai food /center:Jungles of Thailand, tropical rainforest [blurry] /right: Castle made of stone, castle in the jungle, tropical vegetation
Another example
/compose /seed:1 /images:2 /size:384×960 /top:ZeldaKingdom GloomyCumulonimbus /bottom:1983Toyota Have a Cookie /guidance:5
Tip: Use a guidance of about 5 for better blending. You can also specify the model. Guidance applies to the entire image. We are working on adding regional guidance.
/compose /size:1000x2000 /top: Lion roaring, lion on top of building /center: Apartment building, front of building, entrance /bottom: Dirty city streets, New York city streets [[ugly]] [[blurry] /images:1 /guidance:7
BLEND
(IP ADAPTERS)
Prerequisite: Please master ControlNet first.
Blend allows you to fuse multiple images that are stored images from your ControlNet library. This is based on a technology called IP Adapters. This is a horribly confusing name for most people, so we just call it blend.
First, create some preset image concepts by pasting a photo into you bot, and giving it a name exactly how you’d do it for ControlNet. If you already have controls saved, those work, too.
/control /new:chicken
After you have two or more of those, you can blend them together.
/render /blend:chicken:1 /blend:zelda:-0.4
Tip: IP Adapters supports negative images. It is recommended to subtract a noise image to get better pictures.
You can control the noisiness of this image with /blendnoise
Default is 0.25. You can disable with /blendnoise:0.0
You can also set the strength of the IP Adapters effect with /blendguidance – default is 0.7
Tip: Blend can also be used when inpainting and SDXL models
AFTER DETAILER
The /render command has many powerful parameters. A popular one is After Detailer, aka Adetailer
/render /adetailer a close-up photo of a gorilla jogging in the park <sdxl>
This will scan your image for bad hands, eyes, and faces immediately after the image is created, and fixes them automatically. It works with SDXL and SD15 as of March ’24
Limitations:
It may miss faces turned to ~15 degrees or create two faces in this case.
After Detailer works best when used alongside good positive and negative prompts, and inversions, explained below:
FREE U
FreeU (Free Lunch in Diffusion U-Net) is an experimental detailer that expands the guidance range at four separate intervals during the render. There are 4 possible values, each between 0-2.
b1: backbone factor of the first stage
b2: backbone factor of the second stage
s1: skip factor of the first stage
s2: skip factor of the second stage
/render <av5> a drunk horse in Rome /freeu:1.1,1.2,0.9,0.2
Image creation commands
POLLY
Polly is your image creation assistant and the fastest way to write detailed prompts. When you ‘Fave a model in concepts, Polly will choose one of your favorites at random.
To use Polly in Telegram, talk to it like this:
/polly a silly policeman investigates a donut factory
The reply will contain a prompt that you can render right there, or copy to your clipboard to use with the /render command (explained below).
You can also have a regular chat conversation by starting with /raw
/polly /raw explain the cultural significance of japanese randoseru
You can also use it from your web browser by logging into my.graydient.ai and clicking the Polly icon.
BOTS
Polly can be customized. You can train your assistant
/bots
Bots will display a list of assistants that you’ve created. For example, if my assistant is Alice, I can use it like /alicebot go make me a sandwich. The @piratediffusion_bot must be in the same channel with you.
To create a new one, type
/bots /new
RENDER
If you don’t want prompt-writing help from Polly or your custom bots, switch to the /render command to go fully manual. Try a quick lesson.
/render a close-up photo of a gorilla jogging in the park <sdxl>
The trigger word <sdxl> refers to a concept
INLINE POSITIVES, NEGATIVES
Positives tell the AI what to emphasize. This is expressed with (round brackets). Each pair of brackets represents a 1.1x multiple of positive reinforcement. Negatives do the opposite, using [square] brackets.
/render <sdxl>
((high quality, masterpiece, masterwork))   [[low resolution, worst quality, blurry, mediocre, bad art, deformed, disfigured, elongated, disproportionate, anatomically incorrect, unrealistic proportions, mutant, mutated, melted, abstract, surrealism, sloppy, crooked]]
Takoyaki on a plate
Adding too many brackets may limit how much the AI can fill in, so if you are seeing glitches in your image, try reducing the number of brackets and inversions.
Tip: How to make quick prompt edits:
After a prompt is submited, recall it quickly by pressing the UP arrow from Telegram Desktop. Or single-tap the echoed prompt confirmation that appears in an alt font. Word order matters. Put the most important words towards the front of your prompt for best results: Camera Angle, Who, What, Where.
TRANSLATE
Do you prefer to prompt in a different language? You can render images in over 50 languages, like this:
/render /translate un perro muy guapo <sdxl>
It’s not required to specify which language, it just knows. When using translate, avoid using slang. If the AI didn’t understand your prompt, try rephrasing it in more obvious terms.
Translation Limitations
Some regional slang may be misunderstood, so prompt as literally and by the book as possible when using the translation feature. For example, “cubito de hielo” could mean small ice cube or a small pail bucket of ice in Spanish, depending on the region and contextual nuance.
To be fair, this can also happen in English as the AI can take things too literally. For example, one user requested a polar bear hunting, and it gave it a sniper rifle. Malicious compliance!
To avoid this from happening, use multiple words in your positive and negative prompt.
RECIPE MACROS
Recipes are prompt templates. A recipe can contain tokens, samplers, models, textual inversions, and more. This is a real time saver, and worth learning if you find yourself repeating the same things in your prompt over and over.
When we introduced negative inversions , many asked “why aren’t these turned on by default?”, and the answer is control — everyone likes slightly different settings. Our solution to this was recipes: hashtags that summon prompt templates.
To see a list of them, type /recipes or browse them on our website: the master list of prompt templates
/recipes
Most recipes were created by the community, and may change at any time as they are managed by their respective owners. A prompt is intended to have only 1 recipe, or things can get weird.
There are two ways to use a recipe. You can call it by it’s name using a hashtag, like the “quick” recipe:
/render a cool dog #quick
Some popular recipes are #nfix and #eggs and #boost and #everythingbad and #sdxlreal.
Important: When creating a recipe, it’s required to add $prompt somewhere in your positive prompt area, or the recipe can’t accept your text input. You can drop that in anywhere, it’s flexible.
In the “other commands” field, you can stack other quality-boosting parameters below.
COMPOSE
Compose allows multi-prompt, multi-regional creation. It works best by specifying large canvas sizes and 1 image at a time.The available zones are: background, bottom, bottomcenter, bottomleft, bottomright, center, left, right, top, topcenter, topleft, topright. The format for each zone is x1, y1, x2, y2
/compose /size:2000x700 /left:The tower of Thai food /center:Jungles of Thailand, tropical rainforest [blurry] /right: Castle made of stone, castle in the jungle, tropical vegetation
Another example
/compose /seed:1 /images:2 /size:384×960 /top:ZeldaKingdom GloomyCumulonimbus /bottom:1983Toyota Have a Cookie /guidance:5
Tip: Use a guidance of about 5 for better blending. You can also specify the model. Guidance applies to the entire image. We are working on adding regional guidance.
/compose /size:1000x2000 /top: Lion roaring, lion on top of building /center: Apartment building, front of building, entrance /bottom: Dirty city streets, New York city streets [[ugly]] [[blurry] /images:1 /guidance:7
BLEND
(IP ADAPTERS)
Prerequisite: Please master ControlNet first.
Blend allows you to fuse multiple images that are stored images from your ControlNet library. This is based on a technology called IP Adapters. This is a horribly confusing name for most people, so we just call it blend.
First, create some preset image concepts by pasting a photo into you bot, and giving it a name exactly how you’d do it for ControlNet. If you already have controls saved, those work, too.
/control /new:chicken
After you have two or more of those, you can blend them together.
/render /blend:chicken:1 /blend:zelda:-0.4
Tip: IP Adapters supports negative images. It is recommended to subtract a noise image to get better pictures.
You can control the noisiness of this image with /blendnoise
Default is 0.25. You can disable with /blendnoise:0.0
You can also set the strength of the IP Adapters effect with /blendguidance – default is 0.7
Tip: Blend can also be used when inpainting and SDXL models
AFTER DETAILER
The /render command has many powerful parameters. A popular one is After Detailer, aka Adetailer
/render /adetailer a close-up photo of a gorilla jogging in the park <sdxl>
This will scan your image for bad hands, eyes, and faces immediately after the image is created, and fixes them automatically. It works with SDXL and SD15 as of March ’24
Limitations:
It may miss faces turned to ~15 degrees or create two faces in this case.
After Detailer works best when used alongside good positive and negative prompts, and inversions, explained below:
FREE U
FreeU (Free Lunch in Diffusion U-Net) is an experimental detailer that expands the guidance range at four separate intervals during the render. There are 4 possible values, each between 0-2.
b1: backbone factor of the first stage
b2: backbone factor of the second stage
s1: skip factor of the first stage
s2: skip factor of the second stage
/render <av5> a drunk horse in Rome /freeu:1.1,1.2,0.9,0.2
Concepts overview
Concepts are specialized AI models that generate specific things that cannot be well understood with prompting alone. Multiple concepts can be used together: Typically one Base model and 1-3 LoRas or Inversions are the most common use.
You can also train your own by launching the training web interface:
/makelora
A note about custom loras and privacy:
- Private Loras: Always use the /makelora command from your private conversation with @piratediffusion_bot to make a lora that only you can see. You can also use this within your private subdomain but it will NOT appear on the shared instance of Stable2go or quick create in MyGraydient.
- Public Loras: To train and share your LoRa with the whole community, login to my.graydient.ai and click the LoRaMaker icon. These loras will appear for everyone including your telegram bot.

Model Family
Our software supports two Stable Diffusion families at this time: SD15 (older, trained at 512×512) and Stable Diffusion XL, which is natively 1024×1024. Staying close to these resolutions will produce the best results (and avoid duplicate limbs, etc)
The most important thing to note is that Families are not compatible with each other. An SDXL base cannot be used with an SD15 Lora, and vice-versa.
Syntax:
LIST OF MODELS
The term AI model can also mean chat models, so we call image models “concepts”. A concept can be a person, pose, effect, or art style. To bring those things into your creation, we call their “trigger word” which appear in angled brackets like this: <sdxl>
Our platform has over 8 terabytes of AI concepts preloaded. PirateDiffusion is never stuck in one style, we add new ones daily.
/concepts
The purpose of the /concepts command is to quickly look up trigger words for models as a list in Telegram. At the end of that list, you’ll also find a link to browse concepts visually on our website.
Using concepts
To create an image, pair a concept’s trigger word with the render command (explained below) and describe the photo.
To use one, use it’s trigger name anywhere in the prompt. For example, one of the most popular concepts of the moment is called Realistic Vision 5 SDXL, a realistic “base model” — the basis of the overall image style. The trigger name for Realistic Vision 5 SDXL is <realvis5-xl> so we would then prompt.
/render a dog <realvis4-xl>Tip: Choose 1 base model (like realvis4-xl) one or three loras, and a few negative inversions to create a balanced image. Adding too many or conflicting concepts (like 2 poses) may cause artifacts. Try a lesson or make one yourself
SEARCH MODELS
You can search right from Telegram.
/concept /search:emma
RECENT MODELS
Quickly recall the last ones you’ve tried:
/concept /recent
FAVORITE MODELS
Use the fave command to track and remember your favorite models in a personal list
/concept /fave:concept-name
MY DEFAULT MODEL
Stable Diffusion 1.5 is the default model, but why not replace it with your absolute go-to model instead?
This will impact both your Telegram and Stable2go account. After you do this command, you don’t have to write that <concept-name> every time in your prompts. Of course, you can override it with a different model in a /render.
/concept /default:concept-name
Types of Concepts
Base models are also called “full models” which most strongly determine the style of the image. LoRas and Textual Inversions are smaller models for fine controls. These are small files with specificity over one subject, typically a person or a pose. Inpainting models are only used by the Inpaint and Outpaint tools, and should not be used for rendering or other purposes.

Special concept Tags
The concepts system is organized by tags, with a wide range of topics from animals to poses.
There are some special tags called Types, which tell you how the model behaves. There are also replacements for Positives and Negative Prompts called Detailers and Negatives. When using the Negative concept type, remember to also set the weight as a negative.
NEGATIVE INVERSIONS
The models system has special models called negative inversions, also called negative embeddings. These models were trained on awful-looking images intentionally, to guide the AI on what not to do. Thus, by calling these models as a negative, they boost the quality significantly. The weight of these models must be in double [[negative brackets]], between -0.01 and -2.
/render <sdxl> [[<fastnegative-xl:-2>]]
Takoyaki on a plate

Models with fast-sounding names like “Hyper” and “Turbo” can render images quickly with low parameters, explained below in Guidance / CFG.
Those numbers besides the model names are “weights”
You can control the amount of influence a model has on your image by adjusting its weight. We need weights because models are opinionated, so they pull the image into their own training direction. When multiple models are added, this can cause pixelation and distortion if they do not agree. To solve this, we can lower or increase the weight of each model to get what we want.
The rules of weights
Full models aren’t adjustable. Also known as checkpoints or base models, these are large files that determine the overall art style. To change the art influence of the base model, we simply must switch it to another base model. This is why we have so many in the system.
LoRas and Textual Inversions have flexible weights.
Moving the weight towards the positive makes these models more bold. In layman’s terms, LoRas are more detailed versions of Textual Inversions.
BEST PRACTICES
Always use 1 base model, and add loras and inversions.
Loading multiple base models does not blend them, it will only load one, but it will “tokenize” the others that you loaded, meaning you can just type their names and the same thing will happen without slowing down your render (less models in memory = faster).
For LoRas and Inversions, you can use both and many of them at once, though most people stick to 1-3 as that’s easier to balance.
For SDXL users, you’ll find many tags in the system called “-type”. This is a sub family of models that work best when loaded together. At the time of this guide, the most popular type is Pony (not literally ponies) which have better prompt cohesion, especially for sexy stuff. Pony Loras work best with Pony base models, and so on.
POSITIVE MODEL WEIGHTS
The limits of weights are -2 (negative) and 2 (max). A weight between 0.4 – 0.7 typically works best. Numbers above 0.1 have a similar effect to a ((positive prompt)). There are over ten digits of decimal precision available, but most people stick to a single digit, and that’s what we recommend.
NEGATIVE MODEL WEIGHTS (see negative inversions above)
It’s possible to negatively influence the image to get a net positive effect.
For example, someone trained a collection of gnarly looking AI hands and loading that as a negative creates beautiful hands. The solution was quite ingenious. You’ll find many kinds of quality hacks like this in our system. They save us time from typing stuff like [[bad quality]] over and over. When using a negative model, slide the weight to the negative, typically -1 or -2. It has a similar effect a [[negative prompt]]
Troubleshooting
Using many models can be like playing many songs at the same time: if they are all the same volume (weight) it’s hard to pick out anything.
If the images appear overly blocky or pixelated, make sure you have a base model and your guidance is set to 7 or lower, and your positives and negatives are not too strong. Try adjusting your weights to find the best balance. Learn more about Guidance and Parameters in the guide below.
Parameters
Resolution: Width and Height
AI model photos are “trained” at a specific size, so creating images close to those sizes produces the best results. When we try to go too large too soon, it may result in glitches (twins, extra limbs).
Guidelines
- Stable Diffusion XL models: Start at 1024×1024, and it’s usually safe below 1400×1400.
- Stable Diffusion 1.5 was trained at 512×512, so the upper limits are 768×768. A few advanced models like Photon will perform at 960×576. more SD15 size tips
- You can always upscale on a second step close to 4K, see the Facelift upscaler info below.
Syntax
You can change the shape of an image easily with these shorthand commands: /portrait /tall /landscape /wide
/render /portrait a gorilla jogging in the park <sdxl>You can also manually set the resolution with /size. By default, draft images are created as 512×512. These can look a little fuzzy, so using the size command will give you a clearer-looking result.
/render /size:768x768 a gorilla jogging in the park <sdxl>Limitations: Stable Diffusion 1.5 is trained at 512×512, so going too high will result in double heads and other mutations. SDXL is trained at 1024×1024, so a size like 1200×800 will work better with an SDXL model than an SD 1.5 model, as there will be less likely repetition. If you are getting duplicate subjects by using /size try starting the prompt with 1 woman/man and describe the background in more detail at the end of the prompt.
To achieve 2000×2000 and 4000×4000, use upscaling
Seed
An arbitrary number used to initialize the image generation process. This isn’t a specific image (it’s not like a photo ID in the database), but more of a general marker. The purpose of a seed is to help repeat an image prompt. Seed was originally the best way to maintain persistent characters, but that has been superseded by the Concepts system.
To repeat an image: the Seed, Guidance, Sampler, Concepts and prompt should be the same. Any deviation of these will change the image.
SYNTAX
/render /seed:123456 cats in space

Steps
The number of iterations the AI takes to refine the image, with more steps generally leading to higher quality. Of course, the higher step count results in slower processing.
/render /steps:25 (((cool))) cats in space, heavens
Setting steps to 25 is the average. If you don’t specify steps, we set it to 50 by default, which is high. The range of steps 1 to 100 when set manually, and as high as 200 steps when used with a preset. The presets are:
- waymore – 200 steps, two images – best for quality
- more -100 steps, three images
- less – 25 steps, six images
- wayless – 15 steps, nine images! – best for drafts
/render /steps:waymore (((cool))) cats in space, heavens
While it may be tempting to set /steps:waymore on every render, it just slows down your workflow as the compute time takes longer. Crank up the steps when you have crafted your best prompt. Alternatively, learn how to use the LCM sampler instead to get the highest quality images with the fewest number of steps. Too many steps can also fry an image.
EXCEPTIONS
The old advice was to work above 35 steps or higher to achieve quality, however this is no longer always the case, as newer high-efficiency models can create a stunning image with only 4 steps!

Guidance (CFG)
The Classifier-Free Guidance scale is a parameter that controls how closely the AI follows the prompt; higher values mean more adherence to the prompt.
When this value is set higher, the image can appear sharper but the AI will have less “creativity” to fill in the spaces, so pixelation and glitches may occur.
A safe default is 7 for the most common base models. However, there are special high efficiency models that use a different guidance scale, which are explained below.
SYNTAX
/render <sdxl> [[<fastnegative-xl:-2>]]
/guidance:7
/size:1024x1024
Takoyaki on a plate
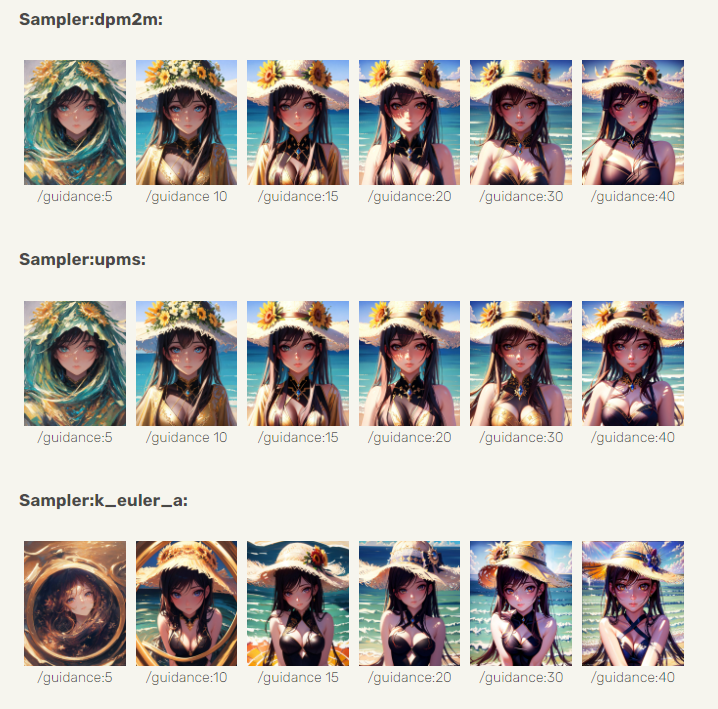
How high or how low the guidance should be set depends on the sampler that you are using. Samplers are explained below. The amount of steps allowed to “solve” an image can also play an important role.
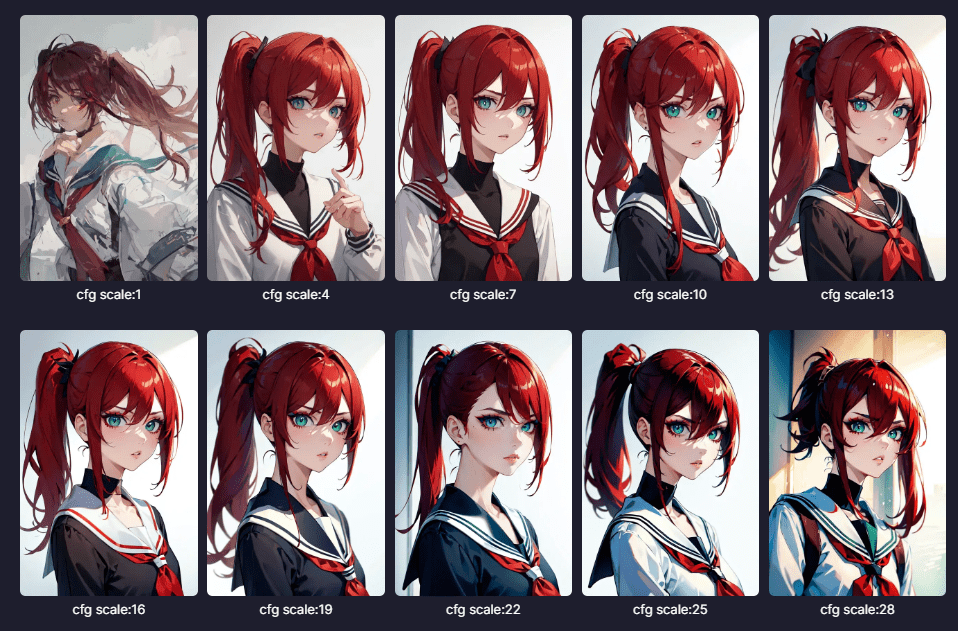
Exceptions to the rule
Typical models follow this guidance and step pattern, but newer high efficiency models require far less guidance to function in the same way, between 1.5 – 2.5. This is explained below:
High Efficiency Models
Low Steps, Low Guidance
Most concepts require a guidance of 7 and 35+ steps to generate a great image. This is changing as higher efficiency models have arrived.
These models can create images in 1/4 of the time, only requiring 4-12 steps with lower guidance. You can find them tagged as Turbo, Hyper, LCM, and Lightning in the concepts system, and they’re compatible with classic models. You can use them alongside Loras and Inversions of the same model family. The SDXL family has the biggest selection (use the pulldown menu, far right). Juggernaut 9 Lightining is a popular choice.

Some of our other favorite Lightning models are <boltning-xl> and <realvis4light-xl> which look great with a guidance of 2, steps between 4-12, and Refiner (no fix) turned off. Polish it off with a good negative like [[<fastnegative-xl:-2>]]. Follow it up with an upscale, and the effects are stunning!
Look into the notes of these special model types for more details on how to use them, like Aetherverse-XL (pictured below), with a guidance of 2.5 and 8 steps as pictured below.

VASS (SDXL only)
Vass is an HDR mode for SDXL, which may also improve composition and reduce color saturation. Some prefer it, others may not. If the image looks too colorful, try it without Refiner (NoFix)
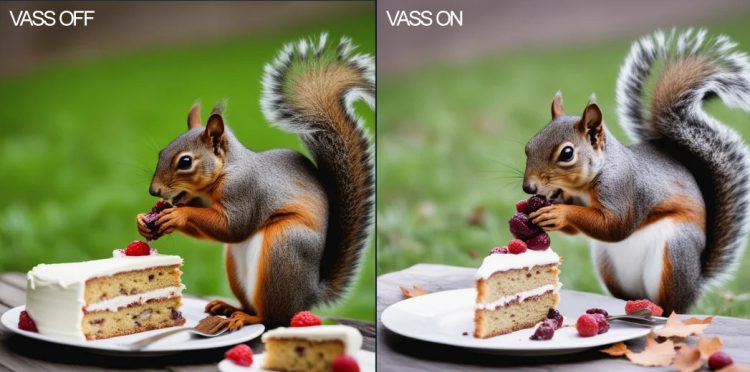
The name comes from Timothy Alexis Vass, an independent researcher that has been exploring the SDXL latent space and has made some interesting observations. His aim is color correction, and improving the content of images. We have adapted his published code to run in PirateDiffusion.
/render a cool cat <sdxl> /vass
Why and when to use it: Try it on SDXL images that are too yellow, off-center, or the color range feels limited. You should see better vibrance and cleaned up backgrounds.
Limitations: This only works in SDXL.
PARSERS & WEIGHTS
The part of the software that ingests your prompt is called a Parser. The parser has the biggest impact on prompt cohesion — how well the AI understands both what you’re trying to express and what to prioritize most.
PirateDiffusion has three parser modes: default, LPW, and Weights (parser “new”). They all have their strengths and disadvantages, so it really comes down to your prompting style and how you feel about syntaxt.
MODE 1 – DEFAULT PARSER (EASIEST)
The default parser offers the most compatibility and features, but can only pass 77 tokens (logical ideas or word parts) before Stable Diffusion stops paying attention to the long prompt. To convey what is important, you can add (positive) and [negative] reinforcement as explained in the section above (see positives). This works with SD 1.5 and SDXL.
Long Prompt Weights (experimental)
You can write longer positive and negative prompts when it’s turned on. Watch a video demo.
Example:
((high quality, masterpiece, masterwork)) A wizard browsing through a magical marketplace with a mystical air around him. He has pointy ears, spectacles perched precariously on his nose, and a wand twirling in hsi hand. His robes are adorned with intricate patterns and patterns of magic dust. There is a bubbling magical cauldron, and mythical creatures peeking around from behind him.

This is a prompt rebalancing utility that allows the prompt comprehension to go much further than 77 tokens, improving prompt comprehension overall. Of course, we would set this as the norm if were not for some unfortunate tradeoffs:
Limitations
- Requires a lower guidance for best results, around 7 or less
- LPW Should not be combined with very heavy positive or negative prompting
- (((((This will break)))))
- [[[[so will this]]]]
- Does not work well with Loras or Inversion concepts
- LPW is not 100% compatible with the Remix tool
- Does not work with LCM sampler
PROMPT LENGTH
/render /lpw my spoon is too big, ((((big spoon)))) [small spoon], super big, massively big, you would not believe the size, and I've seen many spoons and let me tell you, this spoon in my hand, right here, is yuuuuge, the biggest spoon you'll ever see, and if anyone's said they've seen a bigger spoon, they're cheating, Big spoon, gigantic ladle, extra large serving bowl, oversized utensil, huge portion size, bulky kitchenware, impressive cooking tools, rustic table setting, hearty meals, heavyweight handle, strong grip, stylish design, handcrafted wooden piece, <coma2>
WORD WEIGHT
PARSER “NEW” AKA PROMPT WEIGHTS
Another strategy for better prompt cohesion is to give each word a “weight”. The weight range is 0 – 2 using decimals, similar to LoRas. The syntax is a little tricky, but both positive and negative weights are supported for incredible precision
/render /parser:new (blue cat:0.1) (green bird:0.2) [(blue cat:2), (red dog:0.1)]
Pay special attention to the negatives, which use a combination [( )] pair to express negatives. In the example above, blue cat and red dog are the negatives. This feature cannot be mixed with /lpw (above)
CLIP SKIP
This feature is controversial, as it is very subjective and the effects will vary greatly from model to model.
AI models are made up of layers, and in the first layers it is said to contain too much general information (some might say, junk) resulting in boring or repetitive compositions.
The idea behind Clip Skip is to ignore the noise generated in these layers and go straight into the meat.
/render /images:1 /guidance:8 /seed:123 /size:1024x1024 /sampler:dpm2m /karras <sdxl> huge diet coke /clipskip:2
In theory, it in creases cohesion and prompt intention. However, in practice, clipping too many layers may result in a bad image. While the jury is out on this one, a popular “safe” setting is clipskip 2.
Refiner (SDXL only)
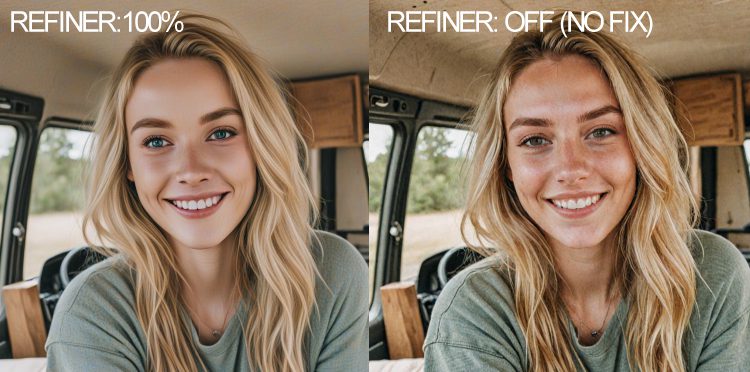
The refiner is a noise removal and smoothing technique, recommended for paintings and illustrations. It creates smoother images with cleaner colors. However, sometimes is the opposite of what you want. For realistic images, turning off the refiner will result in more color and details, as shown below. You can then upscale the image to reduce the noise and boost the resolution.
SYNTAX
/render a cool cat <sdxl> /nofix
Why and when to use it: When the image looks too washed, or skin colors look dull. Add post-processing using one of the reply commands (below) like /highdef or /facelift to make the image more finished.
SAMPLER COMMANDS AND SYNTAX
To see a list of available samplers, simply type /samplers
Samplers are a popular tweaking feature by AI enthusiasts, and here’s what they do. The y’re also called noise schedulers. The amount of steps and the sampler you choose can make a big impact on an image. Even with low steps, you can get a terrific picture with our a sampler like DPM 2++ with the optional mode “Karras”. See samplers page for comparisons.
To use it, add this to your prompt
/render /sampler:dpm2m /karras a beautiful woman <sdxl>
Karras is an optional mode that works with 4 samplers. In our testing, it can result in more pleasing results.
LCM in Stable Diffusion stands for Latent Consistency Models. Use it to get images back faster by stacking it with lower steps and guidance. The tradeoff is speed above quality, though it can produce stunning images very quickly in large batches.
/render /sampler:lcm /guidance:1.5 /steps:6 /images:9 /size:1024x1024 <realvis2-xl> /seed:469498 /nofix Oil painting, oil on board, painted picture Retro fantasy art by Brom by Gerald Brom ((high quality, masterpiece,masterwork)) [[low resolution,m worst quality, blurry, mediocre, bad art, deformed, disfigured, elongated, disproportionate, anatomically incorrect, unrealistic proportions, melted, abstract, surrealism, sloppy, crooked, skull, skulls]] Closeup Portrait A wizard stands in an alien landscape desert wearing wizards robes and a magic hat
Tips: When using SDXL, add /nofix to disable refiner, it may help boost quality, especially when doing /more
It works with SD 1.5 and SDXL models. Try it with guidance between 2-4 and steps between 8-12. Please do experiment and share your findings in VIP prompt engineering discussion group, found in your membership section on Patreon.
It will vary by model, but even /guidance:1.5 /steps:6 /images:9 is returning good SDXL results in under 10 seconds!
/render
/size:1024x1024
<airtist-xl> [[<fastnegative-xl:-2>]]
/sampler:lcm
/guidance:1.5
/steps:6
/nofix
/vae:madebyollin__sdxl-vae-fp16-fix
((high quality, masterpiece,masterwork))   [[low resolution, worst quality, blurry, mediocre, bad art, deformed, disfigured, elongated, disproportionate, anatomically incorrect, unrealistic proportions, mutant, mutated, melted, abstract, surrealism, sloppy, crooked]]
Takoyaki on a plate
In the example above, the creator is using the special LCM sampler that allows for very low guidance and low steps, yet still creates very high-quality images. Compare this prompt with something like: /sampler:dpm2m /karras /guidance:7 /steps:35
Skipping ahead, the VAE command controls colors, and /nofix turns off the SDXL refiner. These work well with LCM.
VAE OVERRIDE
VAE stands for Variational AutoEncoder, a part of the software that has a lot of influence on how colorful the image is. For SDXL, there is only one fantastic VAE at this time.
VAE is a special type of model that can be used to change the contrast, quality, and color saturation. If an image looks overly foggy and your guidance is set above 10, the VAE might be the culprit. VAE stands for “variational autoencoder” and is a technique that reclassifies images, similar to how a zip file can compress and restore an image. The VAE “rehydrates” the image based on the data that it has been exposed to, instead of discrete values. If all of your renders images appear desaturated, blurry, or have purple spots, changing the VAE is the best solution. (Also please notify us so we can set the correct one by default). 16 bit VAE run fastest.
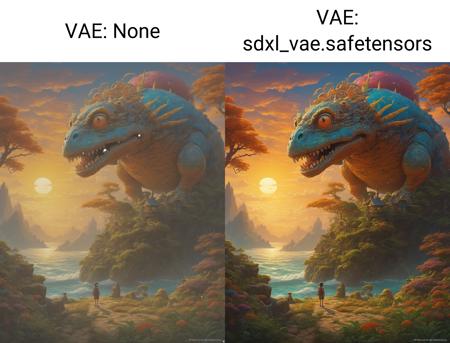
/render #sdxlreal a hamster singing in the subway /vae:GraydientPlatformAPI__bright-vae-xl
Available preset VAE options:
- /vae:GraydientPlatformAPI__bright-vae-xl
- /vae:GraydientPlatformAPI__sd-vae-ft-ema
- /vae:GraydientPlatformAPI__vae-klf8anime2
- /vae:GraydientPlatformAPI__vae-blessed2
- /vae:GraydientPlatformAPI__vae-anything45
- /vae:GraydientPlatformAPI__vae-orange
- /vae:GraydientPlatformAPI__vae-pastel
Third party VAE:
Upload or find one on the Huggingface website with this folder directory setup:
https://huggingface.co/madebyollin/sdxl-vae-fp16-fix
Then replace the slashes and remove the front part of the URL, like this:
/render whatever /vae:madebyollin__sdxl-vae-fp16-fix
The vae folder must have the following characteristics:
- A single VAE per folder, in a top-level folder of a Huggingface profile as shown above
- The folder must contain a config.json
- The file must be in .bin format
- The bin file must be named “diffusion_pytorch_model.bin” Where to find more: Huggingface and Civitai may have others, but they must be converted to the format above
- kofi2 — very colorful and saturated
- blessed2 — less saturated than kofi2
- anything45 — less saturated than blessed2
- orange — medium saturation, punchy greens
- pastel — vivid colors, like old Dutch masters
- ft-mse-840000-ema-pruned – great for realism
Projects
You can render images directly into project folders in Unified WebUI and PirateDiffusion Telegram.
Telegram and API method:
/render my cool prompt /project:xyz
Web Method:
- First, render an image to kick off your project in your @piratediffusion_bot
- Launch My Graydient > My Images
- Select the images
- Click Organize
- Click the Projects pulldown
- Give your project a name
- Move your first images
Continue to the bottom of this guide for /project related commands

ControlNet via PirateDiffusion
ControlNets are image-to-image stencils for guiding the final image. Believe it or not, you can use Controlnet natively within Telegram without the browser, though we support both.
You can provide a starting image as the stencil, choose a mode, and change that source image’s look with a positive and negative prompt. You can control the effect with the weight slider. Input images between 768×768 or 1400×1400 work best.
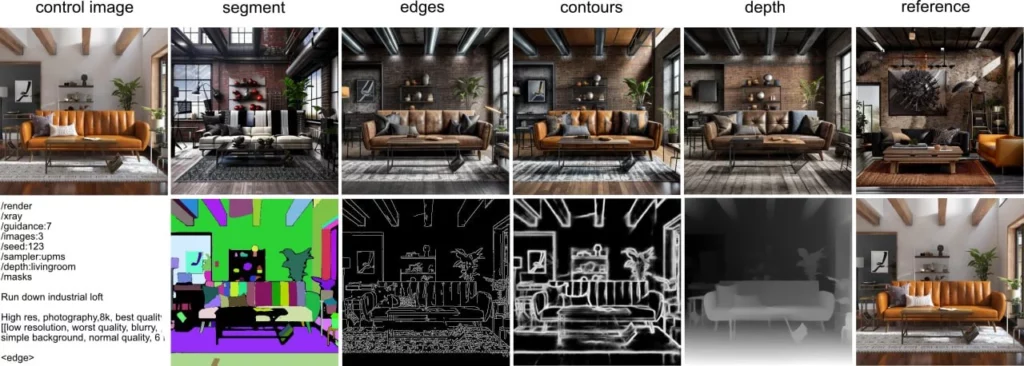
At this time, the modes supported are contours, depth, edges, hands, pose, reference, segment, skeleton, and facepush, each which have child parameters. More Examples
Viewing your controlnet saved presets
/control
Make a ControlNet Preset
First, upload an image. Then “reply” to that image with this command, giving it a name like “myfavoriteguy2”
/control /new:myfavoriteguy2
Controlnets are resolution sensitive, so it will respond with the image resolution as part of the name. So if I upload a photo of Will Smith, the bot will respond will-smith-1000×1000 or whatever my image size was. This is useful in helping you remember what size to target later.
Recall a ControlNet Preset
If you forgot what your preset does, use the show command to see them: /control or to see a specific one:
/control /show:myfavoriteguy2
Using ControlNet Modes
The (new) shorthand parameter for control guidance is /cg:0.1-2 – controls how much the render should stick to a given controlnet mode. A sweet spot is 0.1-0.5. You can also write it out the old long way as /controlguidance:1
Swapping Faces
FaceSwapping is also available as a reply command. You can also use this handy faceswap (roop, insightface) to change out the faces of an uploaded pic. First create the control for the image, and then add a second picture to swap the face
As a reply command (right click on a finished image, from any model)
/faceswap myfavoriteguy2
facelift also supports a /strength parameter, but the way it works is not what you expect:
/faceswap /strength:0.5 myfavoriteguy2 If you put a /strength less than 1, it will *blend* the “before image” with the “after image” – literally blend them, like in photoshop with 50% opacity (if strength was 0.5). The reason for this is because the underlying algorithm does not have a “strength” setting like you’d expect, so this was our only option.
Pushing Faces
Faceswapping (explained above) but as a render-time command is called “face pushing”
You can also use our FaceSwap technology in a way (similar to a LoRa), but it’s just a time-saving way to create a face swap. It does not have weights or much flexibility, it will find every realistic face in a new render and swap the images to 1 face. Use your same ControlNet preset names to use it.
/render a man eating a sandwich /facepush:myfavoriteguy2
Facepush Limitations
Facepush only works with Stable Diffusion 1.5 models like and the checkpoint must be realistic. It does not work with SDXL models, and may not work with the /more command or some high resolutions. This feature is experimental. If you’re having trouble with /facepush try rendering your prompt and then do /faceswap on the image. It will tell you if the image is not realistic enough. This can sometimes be fixed by applying a /facelift to sharpen the target. /more and /remix may not work as expected (yet)
Upscale tools (various)
Boost Pixels and Details
Increase the details of an image by 4x, as well as remove lines and blemishes from photographs, similar to the “beauty” mode on smartphone cameras. Modes for realistic photos and artwork. more info
HIGH DEF
The HighDef command (also known as High Res Fix) is a quick pixel doubler. Simply reply to the picture to boost it.
/highdef
The highdef command doesn’t have parameters, because the /more command can do what HighDef does and more. This is simply here for your convenience. For pros that want more control, scroll back up and check the /more tutorial video.
After you’ve used the /highdef or /more command, you can upscale it one more time as explained below.
UPSCALERS
Facelift is intended for realistic portrait photographs.
You can use /strength between 0.1 and 1 to control the effect. The default is 1 if not specified.
/facelift
The /facelift command also gives you access to our library of upscalers. Add these parameters to control the effect:
Facelift is a phase 2 upscaler. You should use HighDef first before using Facelift. This is the general upscaling command, which does two things: boosts face details and 4X’s the pixels. It works similar to beauty mode on your smartphone, meaning it can sometimes sandblast faces, especially illustrations. Luckily it has other modes of operation:
/facelift /photo
This turns off the face retouching, and is good for landscapes or natural-looking portraits
/facelift /anime
Despite the name, it’s not just for anime – use it to boost any illustrations
/facelift /size:2000x2000
Limitations: Facelift will try to 4x your image, up to 4000×4000. Telegram does not typically allow this size, and if your image is already HD, trying to 4X will likely run out of memory. If the image is too large and doesn’t come back, try picking it up by typing /history to grab it from web ui, as Telegram has file size limits. Alternatively, use the size parameter as shown above to use less ram when upscaling.
REFINE
Refine is for those times when you want to edit your text outside of Telegram and in your web browser. A quality of life thing.
Your subscription comes with both Telegram and Stable2go WebUI. The refine command lets you switch between Telegram and the web interface. This comes in handy for making quick text changes in your web browser, instead of copy/paste.
/refine
The WebUI will launch in Brew mode by default. Click “Advanced” to switch to Render.
Remix tool
Image-to-Image transformations
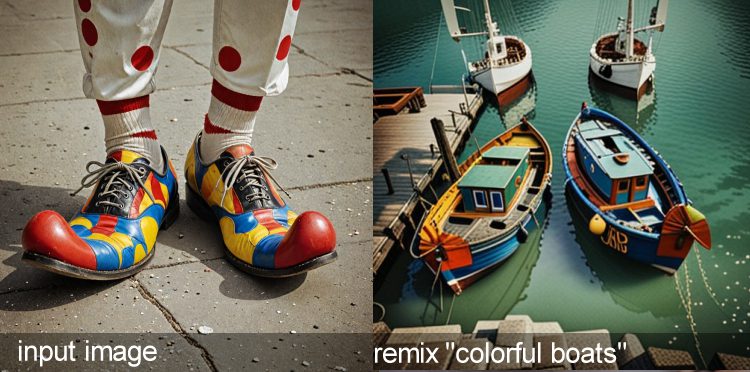
The remix tool is magical. An uploaded or rendered image can be transformed in the art style of a concept with the Remix tool. You can also use input photos as reference pictures to go in dramatically different subject matter changes.
SYNTAX
Remix is the image-to-Image style transfer command, also known as the re-prompting command.
Remix requires an image as the input, and will destroy every pixel in the image to create a completely new image. It is similar to the /more command, but you can pass it another model name and a prompt to change the art style of the image.
Remix is the second most popular “reply” command. Literally reply to a photo as if you are going to talk to it, and then enter the command. This example switches whatever art style you started from into the base model called Level 4.
/remix a portrait <level4>
You can use your uploaded photos with /remix and it will alter them completely. To preserve pixels (such as not changing the face), consider drawing a mask with Inpaint instead.
Uses: Style Transfer and Creative “upscale”
You can also use the remix tool to re-interpret low resolution images into something new, such as turning low resolution video game photos into a modern realistic images, or turn yourself into a caricature or anime illustration. This video shows you how:
More tool (reply command)
The More tool creates variations of the same image
To see the same subject in slightly different variations, use the more tool.
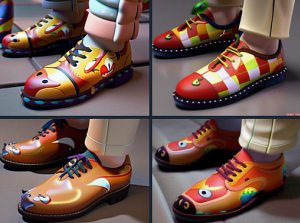
What’s happening under the hood: The seed value is increasing and the guidance is randomized, while retaining your original prompt. Limitations: It may overdo guidance when using Efficient models.
To use more, literally reply to an image by right-clicking, as if you’re talking to a person. Reply commands are used to manipulate images and inspect information, such as IMG2IMG or looking up the original prompt.
MORE SYNTAX
more is the most common Reply command. It gives you back similar images when replying to an image already generated by a prompt. The /more command does not work on an uploaded image.
/more
The more command is more powerful than it seems. It also accepts Strength, Guidance, and Size, so you can use it as a second-phase upscaler as well, particularly useful for Stable Diffusion 1.5 models. Check out this video tutorial to master it.
Inpainting tool
AKA Generative Fill
Inpainting is a masking tool that allows you to draw a mask around an area and prompt something new into it, or remove the object like a magic eraser. The inpaint tool has its own positive and negative prompt box, which also accepts trigger codes for concepts.
Note: Our software has been updated since this video, but the same principles still apply.
GENERATIVE FILL, AKA INPAINTING
Inpaint is a useful for changing a spot area on a photo. Unlike After Detailer, the inpaint tool allows you to select and mask the area you’d like to change.
This tool has a GUI – it is integrated with Stable2go. Inpaint opens a web browser where you will literally paint on the picture, creating a masked area that can be prompted. Inpainting is possible on an uploaded non-AI photo (change the hands, sky, haircut, clothes, etc.) as well as AI images.
/inpaint fireflies buzzing around at night
In the GUI, there are special, specific art styles (inpaint models) available in the pulldown of this tool, so don’t forget to select one. . Use strength and guidance to control the effect, where Strength is referring to your inpaint prompt only.
/inpaint /size:512x768 /strength:1 /guidance:7 fireflies at (night)
Tip: The size will be inherited from the original picture, and 512×768 is recommended. Specifying a size is recommended, or it defaults to 512×512 which might squish your image. If a person is far away in the image, their face may change unless the image is a higher fidelity.
You can also inverse inpaint, such as first using the /bg command to automatically remove the background from an image, then prompt to change the background. To achieve this, copy the mask ID from the /bg results. Then use the /maskinvert property
/inpaint /mask:IAKdybW /maskinvert a majestic view of the night sky with planets and comets zipping by
OUTPAINT AKA CANVAS ZOOM AND PANNING
NEWEST VERSION (FLUX)
Expand any picture using the same rules as inpaint, but without a GUI, so we must specify a trigger word for what kind of art style to use. You can specify which direction it goes with a slot value
/workflow /run:zoomout-flux fireflies at night
DIRECTIONAL CONTROL
You can add padding by using the slot values, counter clockwise. So slot1 = TOP
/workflow /run:zoomout-flux fireflies at night /slot1:200 /slot2:50 /slot3:100 /slot4:300
OLDER VERSIONS (SDXL)
Expand any picture using the same rules as inpaint, but without a GUI, so we must specify a trigger word for what kind of art style to use. The exact same inpaint models are used for outpainting. Learn the names by browsing models page or by using
You can check what models are available with /concept /inpainting
/outpaint fireflies at night <sdxl-inpainting>
Outpaint has additional parameters. Use top, right, bottom, and left to control the direction of where the canvas should expand. If you leave out side, it will go in all four directions evenly. You can also add background blur bokeh (1-100), zoom factor (1-12), and contraction of the original area (0-256). Add strength to reign it in.
/outpaint /side:top /blur:10 /zoom:6 /contract:50 /strength:1 the moon is exploding, fireworks <sdxl-inpainting>
Optional parameters
/side:bottom/top/left/right – you can specify a direction to expand your picture or go in all four at once if you don’t add this command.
/blur:1-100 – blurs the edge between the original area and the newly added one.
/zoom:1-12 – affects the scale of the whole picture, by default it’s set to 4.
/contract:0-256 – makes the original area smaller in comparison to the outpainted one. By default, it’s set to 64.
TIP: For better results, change your prompts for each use of outpaint and include only the things you want to see in the newly expanded area. Copying original prompts may not always work as intended.
Remove BG tool
Lightning fast background zapping
The background removal tool is an easy, one-step solution to eliminating everything behind the subject. Images at or around 800×800 work best. You can also use the inpainting tool (above) to mask and prompt a new background into place.
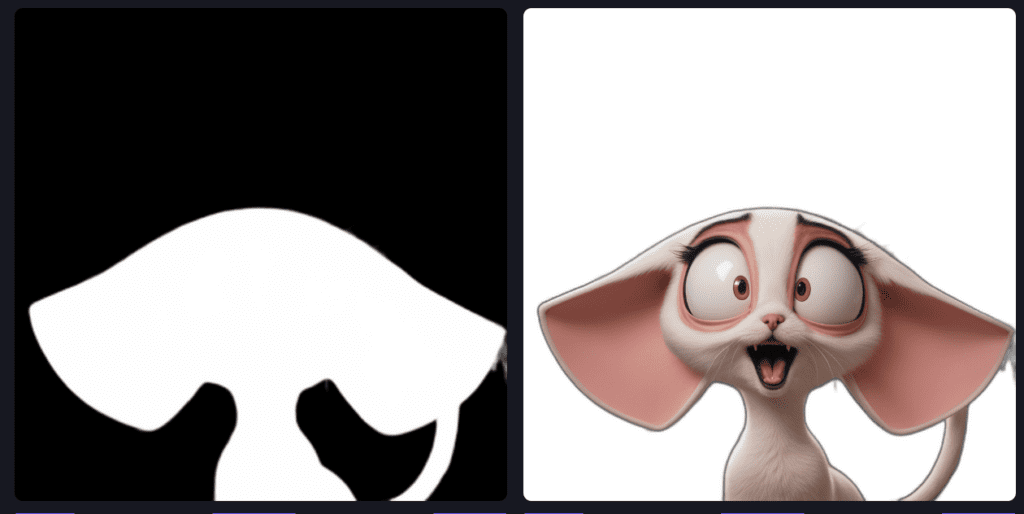
BACKGROUND REMOVE COMMANDS
To remove a realistic background, simply reply to it with /bg
/bg
For illustrations of any kind, add this anime parameter and the removal will become sharper
/bg /anime
You can also add the PNG parameter to download an uncompressed image. It returns a high res JPG by default.
/bg /format:png
You can also use a hex color value to specify the color of the background
/bg /anime /format:png /color:FF4433
You can also download the mask separately
/bg /masks
Tip: What can I do with the mask? To prompt only the background! It can’t be done in one step though. First reply to the mask with /showprompt to get the image code us for inpainting, or pick it from the inpainting recent masks. Add /maskinvert to the background instead of the foreground when making a render.
BACKGROUND REPLACE
You can also use ControlNet style commands to swap the background from a preset:
- Upload an background or render one
- Reply to the background photo with /control /new:Bedroom (or whatever room/area)
- Upload or render the target image, the second image that will receive the stored background
- Reply to the target with /bg /replace:Bedroom /blur:10
The blur parameter is between 0-255, which controls the feathering between the subject and the background. Background Replace works best when the whole subject is in view, meaning that parts of the body or object aren’t obstructed by another object. This will prevent the image from floating or creating an unrealistic background wrap.
SPIN AN OBJECT
You can rotate any image, as if it was a 3D object. It works much better after first removing the background with /bg
/spin
Spin works best after the background is removed. The spin command supports /guidance. Our system randomly chooses a guidance 2 – 10. For greater detail, also add /steps:100
DESCRIBE A PHOTO
Updated! There are now two modes of describe: CLIP and FLORENCE2
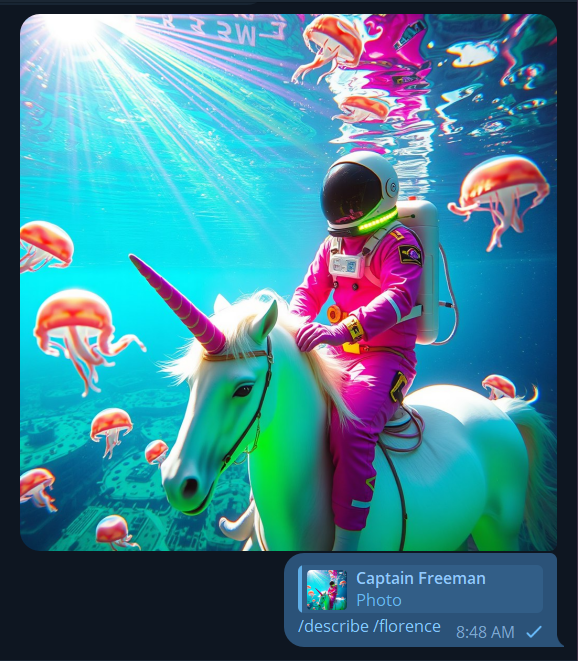
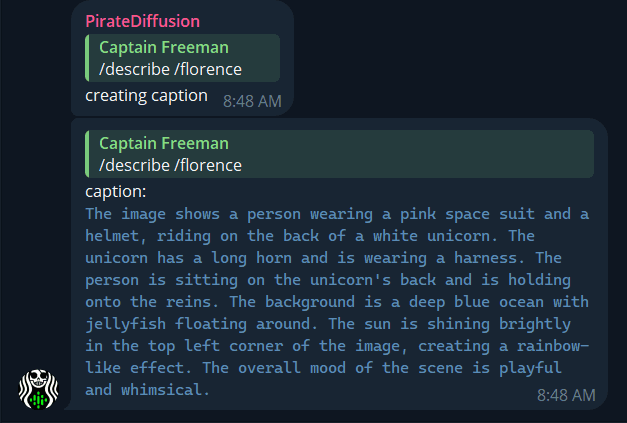
Generate a prompt from any image with computer vision with Describe! It is a “reply” command, so right click on the image as if you were going to talk to it, and write
/describe /florence
The additional Florence parameter gives you a much more detailed prompt. It uses the new Florence2 computer vision model. /describe by itself uses the CLIP model
Example
Launch widgets within PirateDiffusion
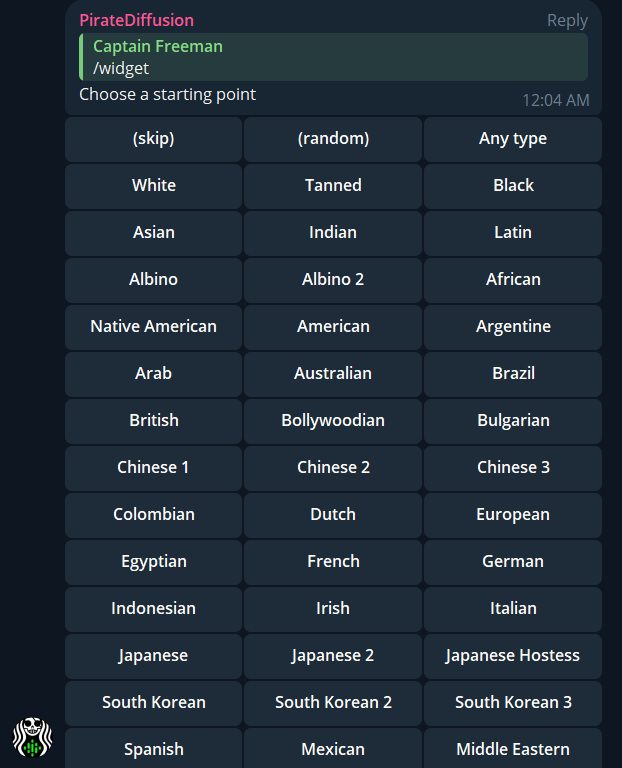
You can create preset buttons for easy push-button creation, without learning how to code. This is made possible by our Widgets system. Simply fill out a spreadsheet with your prompt templates, and connect it to your bot. For example, we provide a template for a character making widget:
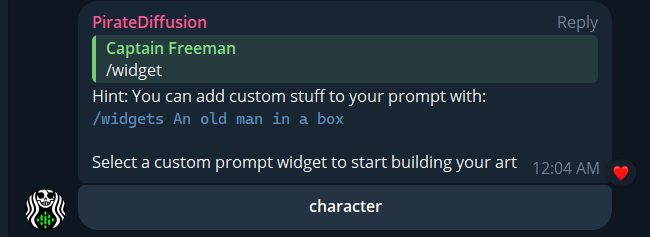
Widgets create both a Telegram and WebUI at the same time, so you can enjoy both! Watch a Video about Widgets and download the template to start building. No coding required!
File & Queue Management
CANCEL
Use /cancel to abort what you’re rendering
/cancel
DOWNLOAD
The images that you see in Telegram are using the Telegram built-in image compressor. It limits the file size.
To get around Telegram, reply to your image with /download to get an uncompressed RAW image
/download
If the download requests a password, see the Private Gallery Sharing and Passwords section in this Cheat Sheet.
DELETE
There’s two ways to delete images: locally from your device, or forever from your Cloud Drive.
To delete images from your local device but keep them on the Cloud Drive, use Telegram’s built in delete feature. Long press an image (or right click on it from PC) and choose delete.
Reply to an image with /delete to wipe it from your cloud drive.
/delete
You can also type /webui and launch our file manager, and use the organize command to batch delete images all at once.
HISTORY
See a list of your recently created images, within that given Telegram channel. When used in public groups, it will only show images that you’ve already created in that public channel only, so /history is also sensitive about your privacy.
/history
SHOWPROMPT & COMPARE
To see an image’s prompt, right click on it and type /showprompt
/showprompt
This handy command lets you inspect how an image was made. It will show you the last action that was taken on the image. To see the full history, write it like this: /showprompt /history
There is an image comparison tool built into the showprompt output. Click on that link and the tool will open in the browser.
DESCRIBE (CLIP)
The /showprompt command will give you the exact prompt of an AI image, but what about non-AI images?
Our /describe command will use computer vision techniques to write a prompt about any photo you’ve uploaded.
/describe
The language /describe uses can sometimes be curious. For example “arafed” means a fun or lively person.
PNG
By default, PirateDiffusion creates images in near-lossless JPG. You can also create images as higher-resolution PNGs instead of JPG. Warning: This will use up 5-10X of the storage space. However, there is a catch. Telegram doesn’t display PNG files natively, so after the PNG is created, use the /download command (above) to see it.
/render a cool cat #everythingbad /format:png
VECTOR
IMAGE TO SVG / VECTOR! Reply to a generated or uploaded image to trace it as vectors, specifically SVG. Vectors images that can be infinitely zoomed since they aren’t rendered with rasterized pixels like regular images; so you have clear sharp edges. Great for printing; products, etc. Use the /bg command if you’re creating a logo or sticker.
/trace
All available options are listed below. We don’t know the optional ones yet, so help us arrive at a good default by sharing your findings in VIP chat.
- speckle – integer number – default 4 – range 1 .. 128 – Discard patches smaller than X px in size
- color – default – make image color
- bw – make image black and white
- mode – polygon, spline, or none – default spline – Curver fitting mode
- precision – integer number – default 6 – range 1 .. 8 – Number of significant bits to use in an RGB channel – i.e., more color fidelity at the cost of more “splotches”
- gradient – integer number – default 16 – range 1 ..128 – Color difference between gradient layers
- corner – integer number – default 60 – range 1 .. 180 – Minimum momentary angle (degree) to be considered a corner
- length – floating point number – default 4 – range 3.5 .. 10 – Perform iterative subdivide smooth until all segments are shorter than this length
Example trace with optional fine-tuned paramters:
/trace /color /gradient:32 /corner:1
WEB UI FILE MANAGER
Handy for managing your files in a browser, and looking at a visual list of models quickly.
/webui
Check the accounts section at the top of this page for things like password commands.
RENDER PROGRESS MONITOR
Inevitably, Telegram has connection issues from time to time. If you want to know if our servers are making the images but they’re not making it to Telegram, use this command. You can render and pick up your images from Cloud Drive.
/monitor
If /monitor doesn’t work, try /start. This will give the bot a nudge.
PING
“Are we down, is Telegram down, or did the queue forget me?” /ping tries to answer all of these questions at a glance
/ping
If /ping doesn’t work, try /start. This will give the bot a nudge.
SETTINGS
You can override the default configuration of your bot, such as only selecting a specific sampler, steps, and a very useful one: setting your favorite base model in the place of Stable Diffusion 1.5
/settings
Available settings:
/settings /concept:none
/settings /guidance:random
/settings /style:none
/settings /sampler:random
/settings /steps:default
/settings /silent:off
Pay close attention to the status messages when making a setting change, as it will tell you how to roll back the change. Sometimes reverting requires the parameter off, none, or default
Before making a change to the defaults, you may want to save the defaults as a loadout, as explained below, so you can roll back if you’re not happy with your configuration and want to start over.
LOADOUTS
The /settings command also displays your loadouts at the bottom of the response.
Make switching workflows easier by saving loadouts. For example, you may have a preferred base model and sampler for anime, and a different one for realism, or some other settings for a specific project or client. Loadouts allow you to replace all of your settings in a flash.
For example, if I wanted to save my settings as is, I can make up a name like Morgan’s Presets Feb 14:
/settings /save:morgans-presets-feb14
Manage your loadouts:
Save current settings: /settings /save:coolset1
Display current settings: /settings /show:coolset1
Retrieve a setting: /settings /load:coolset1
SILENT MODE
Are the debugging messages, like confirmation of prompt repeat, too wordy? You can make the bot completely silent with this feature. Just don’t forget you turned this on or you’ll think the bot is ignoring you, it won’t even tell you an estimated time of render or any confirmations!
/settings /silent:on
To turn it back on, just change ON to OFF
Deprecated & Experimental
This is a collection of experiments and older commands are still supported, but have been replaced by newer techniques. These are hard to recommend for production, but still fun to use.
AESTHETICS SCORING
Aesthetics is an experimental option that enables an aesthetics evaluation model on a rendered image, as part of the rendering process. This is also now available in the Graydient API.
These machine learning models attempt to rate the visual quality / beauty of an image in a numerical way
/render a cool cat <sdxl> /aesthetics
It returns an aesthetics (“beauty”) score of 1-10 and an artifacts score of 1-5 (low being better). To see what is considered good or bad, here is the data set. The score can also be seen in /showprompt
BREW
Brew was replaced with /polly. (it used to add random effects)
/brew a cool dog = /polly cool dog
This returns the same result.
MEME
We added this one as a joke, but it still works and is quite hilarious. You can add Internet Huge IMPACT font meme text to the top and bottom of your image, one section at a time.
/meme /top:One does not simply
(next turn)
/meme /bottom:Walk into Mordor
INSTRUCT PIX 2 PIX
Replaced by: Inpaint, Outpaint, and Remix
This was the hot thing at it’s time, a technology called Instruct Pix2Pix, the /edit command. Reply to a photo like this:
/edit add fireworks to the sky
Ask “what if” style questions for images of landscapes and nature, in natural language to see changes. While this technology is cool, Instruct Pix2Pix produces low resolution results, so it is hard to recommend. It is also locked on its own art style, so it is not compatible with our concepts, loras, embeddings, etc. It is locked at 512×512 resolution. If you’re working on lewds or anime, it’s the wrong tool for the job. Use /remix instead.You can also control the effect with a strength parameter
/edit /strength:0.5 What if the buildings are on fire?
STYLES
Styles was replaced by the more powerful recipes system. Styles are used to make personal prompt shortcuts that are not intended for sharing. You can trade styles with another person using the copy command, but they will not work without knowing those codes. Our users found this confusing, so recipes are global. To explore this feature, type:
/styles
