🤖 Available in Telegram and Unified Editor
A Skill is a reusable AI workflow that turns a simple request into a fully structured, optimized render automatically. When a Skill command is issued, the platform autoselects the closest matching AI workflow by analyzing the intent of your prompt.
Before Skills: Look at the PirateDiffusion manual, learn the commands, browse the preinstalled AI models, then put it all together.
With Skills: Learn a single command // and the AI tries to figure out your intent and does the above for you
We are combining two of Graydient’s features: AI large language model thinking and processing, and pairing it to the plethora of ComfyUI workflows created by our team and the community.

This feature is also available in Telegram’s PirateDiffusion by using the // command. Just write two slashes and the prompt.
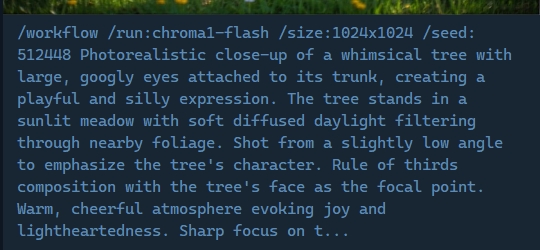
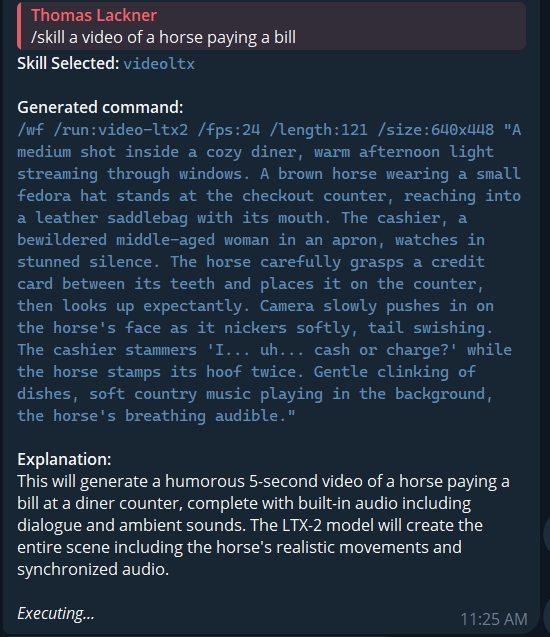
For example, consider this simple prompt. It lacks detail and many AI models don’t perform well without a detailed prompt. Skills looks at their intent and explodes that prompt into something more meaningful, still true to their request…
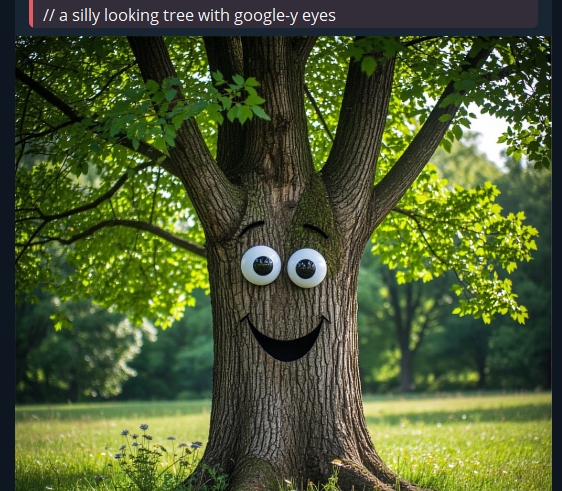
Pictured: The shorthand /skill command used as simply // figures out that the user wants a static image and finds one of the most powerful workflows, and writes a detailed prompt for them. Compare the user’s simple prompt and what it actually used:
Let’s try another example. Without issuing a different command, let’s ask it to animate the tree.
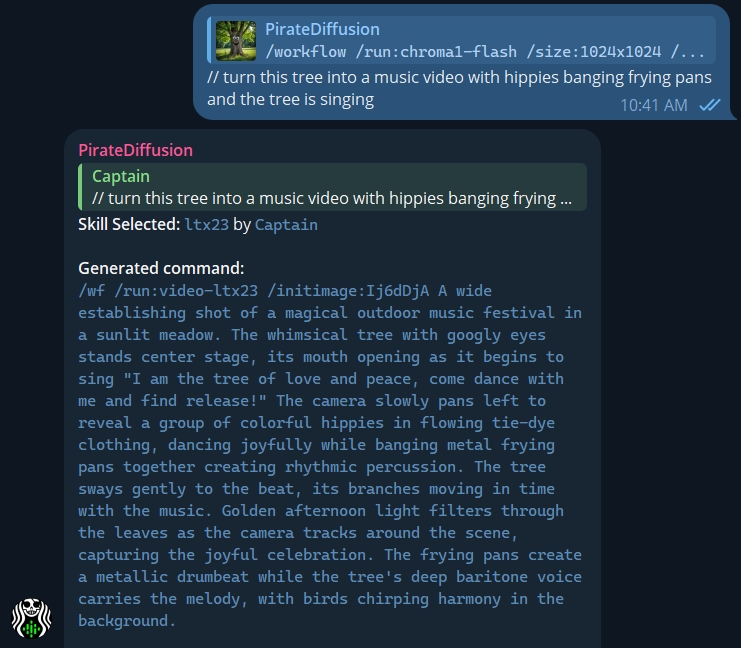
Results: The skill AI understands that now the user wants to animate the static image, so it pulls a relevant video workflow from one of the newest video models. It does this switching without bothering the user to learn commands or workflows.
Who it’s for
Beginners can dive right in without prompting knowledge and get competent results.
To get the most out of our platform, we encourage beginners to learn the differences between skills and vote on the ones they prefer, and try copying the prompts it generates to tune your results manually.
Professionals can create skills to make the // command more powerful and personalized. There is a creation usage guide a few paragraphs down.
This is just a small preview of what skills can do – from simple image generation to animation and other sophisticated tasks. Everyone can learn to program their own skills. You can develop them privately, distribute them for free, or sell Skill prompts.
Here’s how it all works:
USING SKILLS – COMMAND OVERVIEW
To see a list of every possible skill command, simply type /skill by itself. This is a short list of the ones related to using skills.
| Command | Purpose |
| /skill prompt | Creates images or videos based on the intent of your prompt by finding a matching workflow. You will also see voting buttons so you get the skills you liked more often.
You can also specify a photoID |
| // prompt | Shorthand for the above, does the same thing. Saves you some typing! |
| /skill /list | See a list of available preset skills, and your private ones. They are sorted by the ones you like (has voting!) |
| /skill /search | Search your skill list by keyword |
| /skill /run:name | Run a specific skill by specifying the name, bypassing the skill auto-select feature |
| /skill /browser | Opens a web-based skills browser |
| /skill /show:name | Displays a description of a skill. Find names with the list command |
| /skill /mute:name | Remove a skill from your personal auto-select pool. To unmute, repeat the command. Use mute to improve the quality of the AI selection process, so it only chooses prompt templates and workflows that you enjoy. |
| /skill /tune | An easier way to manage your muted skills. See what you have muted and toggle them on and off from a concise menu |
| There are also ‘creation’ commands. | That list is below: |
USING SKILLS
Just describe what you want in natural language — no need for technical parameters or long prompt lists.
For example:
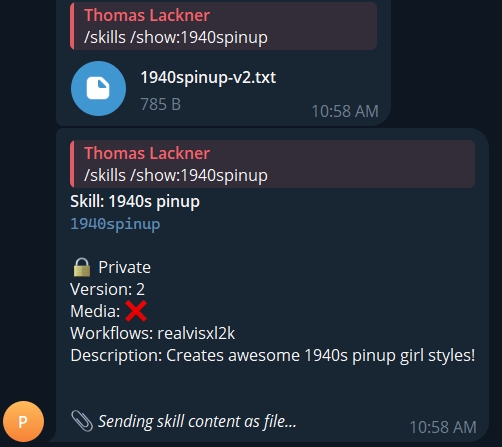
/skill A 1940s pinup girl
You can also use the shortcut code – just two slashes followed by a space, like this:
// A 1940s pinup girl
If you need specific dimensions, just add them naturally. Instead of /size just write it without the slash:
// A 1940s pinup girl, at size 666x444
It takes all of the technical work out of prompting completely — you then just describe exactly what you want, and it finds a “skill” that matches.
Manually specifying a rendered photo that’s in the thread
Consider the image below: You can copy the “photo ID” that appears after an image is created
Then use that ID or Nickname in the skill as shown:

How automatic Skill selection works
You don’t even have to remember exact skill names. The system can intelligently match your intent to the closest fitting skill and run it automatically.
For instance, there are image video generation skills available (WAN, Z-IMAGE, LTX2), you can simply write:
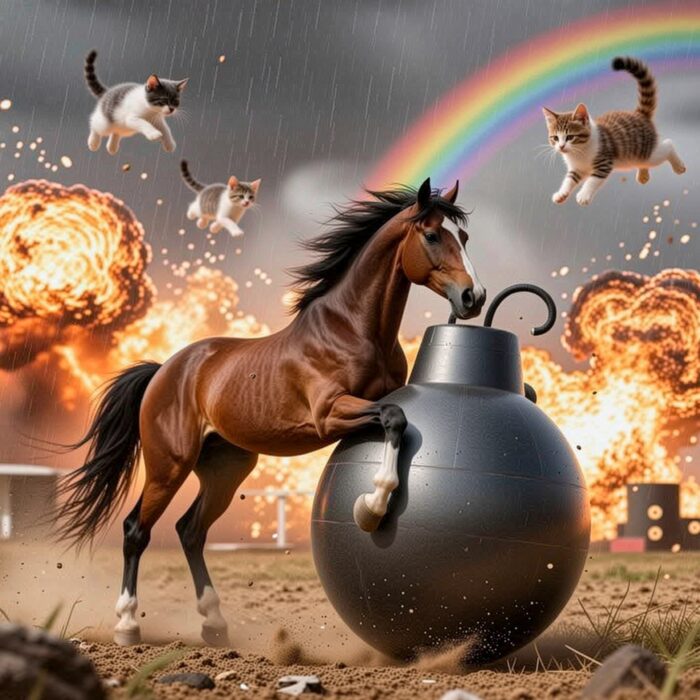
/skill make me an image of a horse jumping on a bomb with kittens and rainbows exploding
The bot will:
-
-
Auto-select a relevant workflow
-
Generate detailed prompts using best practices
-
Start the render automatically
- Give the skill system feedback by voting on how the autoselection was handled and it will improve the next time you run it. Or ReRoll with a different skill.
-
It’s quite powerful!
However, as you add more skills, there may be some that you just don’t care for or want to disable temporarily. That’s where the /skill /tune and /mute commands come in.
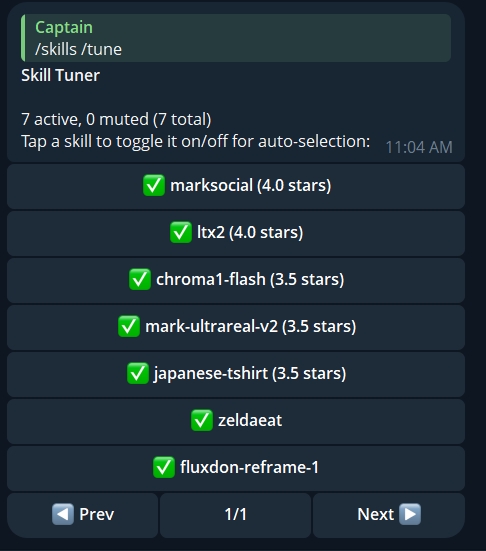
Use this menu to mute skills and see which ones you’ve scored the highest. Click them again to re-enable them.
Voting Matters
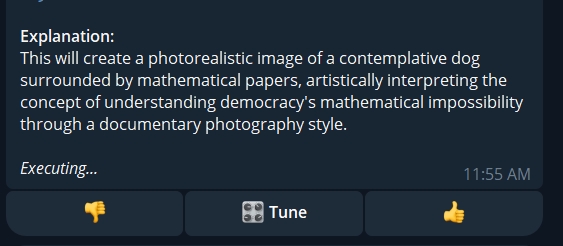
If you like the output, vote it up. If its not for you, downvote it or mute it completely then try the prompt again and a different workflow and prompt template skill will be selected.
Vote on the Skills you like, and they’ll get auto-selected more often
You’ll also find a Tune button with voting at the end of the prompt. Click the dice button to re-roll with a different Skill and mute skills that you don’t want.
Browsing skills
Try /skill /list to see public and owned skills, sorted by your upvotes.
You can also search skills by keywords with /skills /search
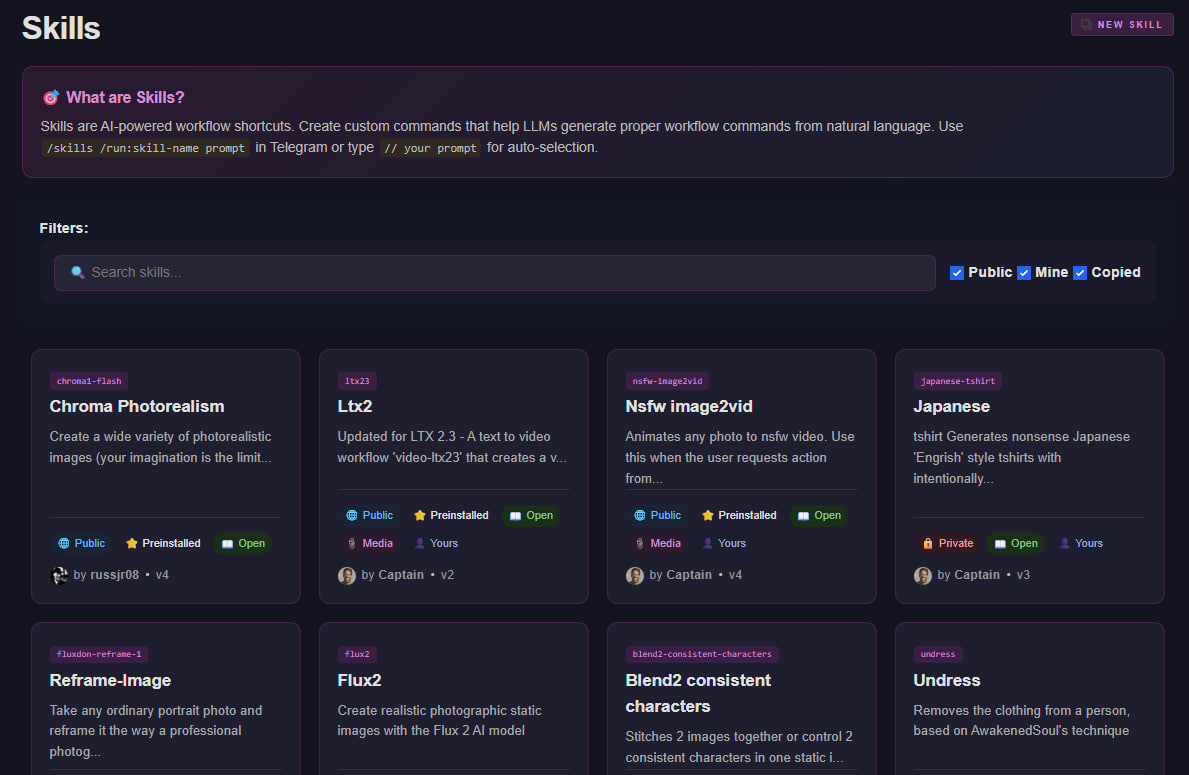
CREATING SKILLS
Text to Image/Video Examples
To see the list of skill-creating command, simply type /skill without a prompt.
This section assumes you’re already an old pro at PirateDiffusion and know how to use workflows, concepts, loras, guidance, and other advanced parameters. If that is all jargon to you, you’re not ready to create skills yet. Please try those commands first, create some beautiful images, and then come back when you have a few favorite prompts under your belt. PirateDiffusion beginner’s help guide
When a skill is created, it goes into the Skills store. You can decide if it is private to you, public, or for sale.
Now let’s create a new skill.
Step 1: Open a text editor on your computer and open one of these example skill templates:
Image Skill templates
- Simple human-edited skill template for FLUX 2
- Simple human-edited Images skill template – SDXL
- Detailed SDXL-illustrious skill template
- Intermediate: two image editing skill for two consistent characters – QWEN
Video & Music Skill Templates
- Simple human-edited Video skill template – WAN
- Advanced music skill template created with Chat GPT – Heart Mula skill
- Advanced video skill created with external app kimi code – github guided LTX2 skill
There is no one correct way to write a skill, there is no standard syntax. Simple skills and incredibly detailed skill prompts will also work as an input! What matters is that your render, concept, parameter, upper limit on things like size, and workflow syntax is accurate.
Step 2: When your template is ready, use the /skill /new command to add it to PirateDiffusion
Open your private 1:1 chat with PirateDiffusion_bot and attach the text file with the name and description in the comments box like this:
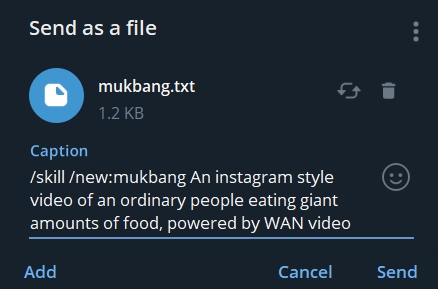
/skill /new:cool-name-of-skill Create talking and moving videos of anything you want! High image quality video generation
Tip: The description is not the prompt! Please define the prompt and instructions in the text file.
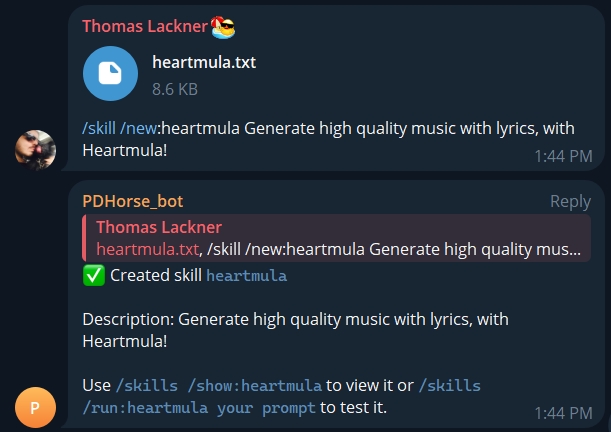
The skill is now ready to be used. Test it using /skill /run:name or use the shorthand mentioned at the top of this tutorial.
Example:
// mukbang an old asian woman eating cement in a busy lumber yard
As you can see, the skill added a lot of extra detail to our simple prompt request and all of the workflow syntax without having to mention it. It created an interesting long detailed prompt and did all of the slash command technical prompting, too.
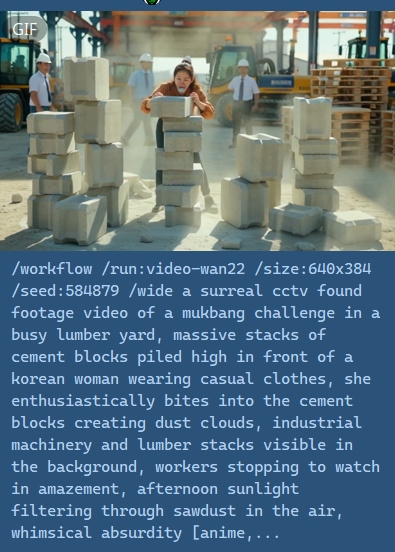
Image to Image/Video and Video-to-Video Examples
Workflows have different image variable names, so there’s no single way to code for this. You have to know what you’re targeting first. The first thing you’ll want to do is run the /workflow /show:name command and make sure you know the image inputs.
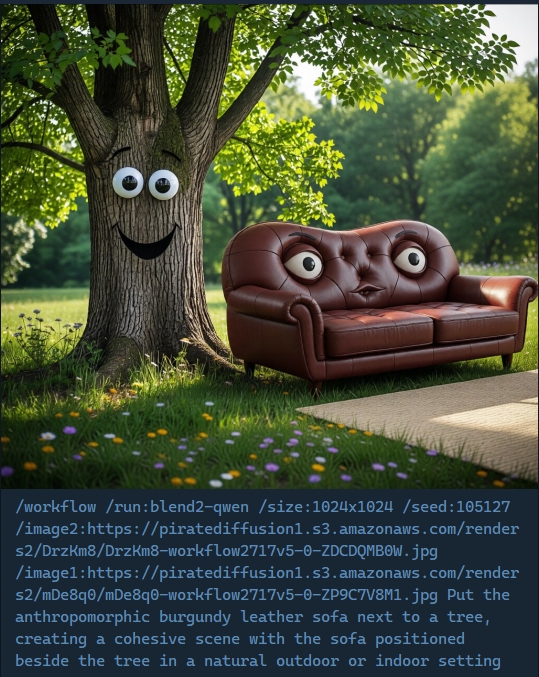
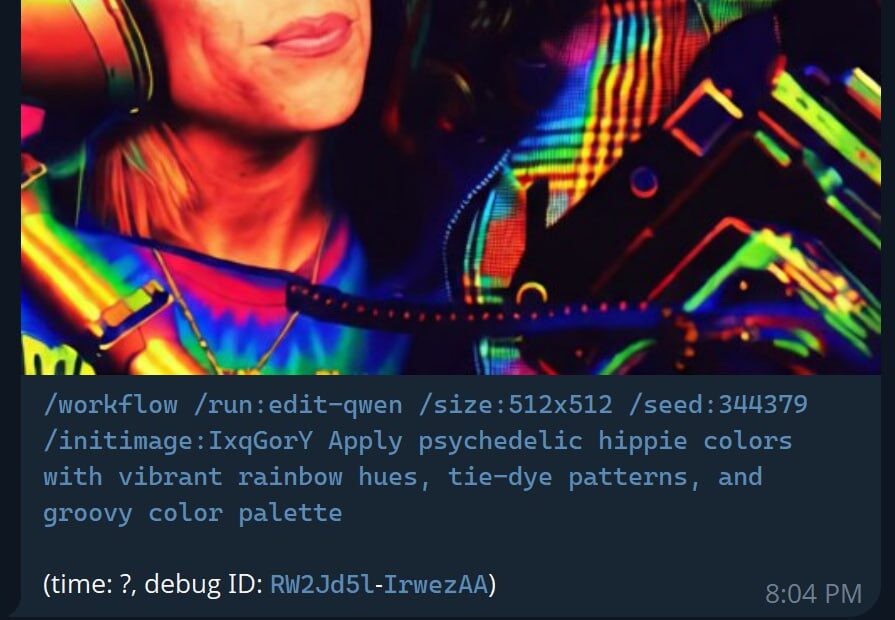
For example, in the workflow ‘blend2-qwen’ the inputs are called /image1 and /image2 so your examples will need those.
So our skill will look like this:
# edit two images into one, edit 2 images into 1, edits 2 images together or control 2 consistent characters in one static image, such as moving objects or people together in one photo, or fusing them together, or posing two characters. The two images use the variables 'image1' and 'image2' followed by their photo IDs.

To change an image, use `blend2-qwen`:

```
/wf /run:blend2-qwen /image1:Ixyz123 /image2:RDrzKm8 edit two images into one, put the sofa in the first photo next to the tree in the second photo
```

Refer to the source image with /image1:IMAGE_ID and require a second photo as /image2:IMAGE_ID2

Transform the users prompt into an instruction for how to edit an image.

Examples:

User input: edit 2 images, put the sofa in the first photo next to the tree in the second photo
Command: /wf /run:blend2-qwen /image1:IMAGE_ID /image2:IMAGE_ID2 A sofa next to a and a tree in the garden

User input: pose the woman in the photo next to the man in the other photo

/workflow /run:blend2-qwen /image1:IMAGE_ID /image2:IMAGE_ID2 edit 2 images. Create a new photograph of two persons. Machoman from image 1 is sitting on chair. Femenina is reading a book. Femenina from image 1 is standing behind him. Machoman is holding a coffee mug.
Another example:
The /initimage: parameter sends the user’s photo to the Skill. However, if we put photo names or IDs in our examples, the LLM will hallucinate the initimage value, so when providing examples express it with the IMAGE_ID value.
The second step is to enable the “media” property of the skill. Do it like this:
/skills /media:name
Likewise, when creating a skill for a video-to-video skill (like extend or upscale) use /initvideo:VIDEO_ID.
Template for Image-to-Image Skill:
# Image Edits and Changes
To change an image, use `edit-qwen`:

```
/wf /run:edit-qwen /initimage:Ixyz123 Change the shirt to red
```

Refer to the source image with /initimage:IMAGE_ID...

Transform the users prompt into an instruction for how to edit an image.

Examples:

User input: Change the shirt to red
Command: /wf /run:edit-qwen /initimage:IMAGE_ID Change the shirt to red

User input: short girl
Command: /wf /run:edit-qwen /initimage:IMAGE_ID Make the girl shorter
Template for Image-To-Video
Likewise, when creating a skill for a video-to-video skill (like extend or upscale) use /initvideo:VIDEO_ID.
image-to-video3 (note: explicit)
Don’t forget to enable the “media” property of the skill. Do it like this:
/skills /media:name
General Tips for new Skill Creators
- Start small. Don’t go straight into a massive wall of text with elaborate instructions. Create a small set of instructions, keep local versions of what worked and didn’t, and upload and test until it is just right.
- You can use your own coding agents like Chat GPT and Kimi Code to fetch URLs to enhance your guide. Point them to Github, for example, and attach the example skills that you see on this page, like this one:Advanced video skill created with external app kimi code – github guided LTX2 skill
- If you use an LLM to create your skill and its example definitions, make sure you include the official PirateDiffusion help guide as a reference. Without it, the model may invent unsupported commands (Third-party apps like Chat GPT are likely to give you bad output like Midjourney tags such as “–ar”), which can break your skill, as those parameters do not exist in PirateDiffusion.
- Test your examples carefully before feeding it to the skill. If it can’t render properly on its own, it will be a headache to debug as a skill.
- If you put the workflow name in square brackets in the skill, it will send the workflow help to the LLM along with your skill text.
Downloading more templates
To view how skills are saved in the system and other notes, use this command to inspect it and download the .txt file to your device:
/skills /show:cool-name-of-skill
FAQ
How can skills benefit my work?
For long-time PirateDiffusion users, Skills are a game-changer. Think of them as programmable AI macros, not just simple wildcards. Skills:
-
Use LLM reasoning to expand on your intent – it writes the whole prompt for you
-
Auto-select appropriate models and workflows (including gen models like Wan, Flux, and more)
-
Support structured prompts and shared workflows
They do more than generate text — they combine best prompting practices into reusable, intelligent mini-apps.
What can I create with skills?
Skills lets you build reusable shortcuts that combine many functionalities in a short prompt. You can:
- Describe how a prompt should work, in natural language, providing various examples to an LLM
- The LLMs (Kimi, Llama, others) handles the hard part: prompt expansion, reasoning, writing, analysis
- Supports all 25,000 on-tap models and workflows like Wan, HunYuan, Flux, SDXL, Qwen, and Z-Image
- Supports file inputs and structured prompts
- Shareable public or private workflows – private by default
Are my skill-created outputs private?
Skills can be private, outputs are normal prompts. Nobody can see your creations unless you use skills in public groups. Your 1:1 use with PirateDiffusion bot is private by default.
The prompts created by a skill are normal, unblocked prompts that can be inspected with the /showprompt /history command when published or shared in a group. What is not viewable is the skill code that generated the prompt. Your skills are private by default unless you manually set them public.
Note that doing the /skills /list command in a group will display the names and descriptions of your skills to others.
What commands can I use inside a skill?
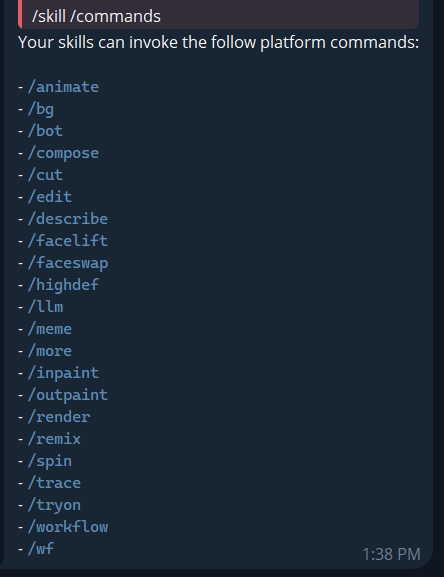
Every PirateDiffusion command is not compatible with skills. The available commands can be listed with:
/skills /commands
Who can create skills?
Everyone can create skills. The skills you create are private.
Public skills are also available — our moderator team is releasing new public/shared skills all of the time. When you use the /skill command for the first time, it is acquiring the vetted skills in the system. Public skills are open source — you can inspect them, download the source code, and modify them as your own.
At the moment we are limiting skill sharing to our moderator team during beta testing. This prevents low-quality or unvetted skills from entering your work.
How do reviews and voting work?
You can also give a thumbs up or thumbs down on how well the skill is working for you, and that has an immediate impact on how Skills are listed and autoselected. The skills that you like most get used more often. This also helps the creator better understand which skills are popular and spot broken or buggy ones. Votes are anonymous.
Sharing skills
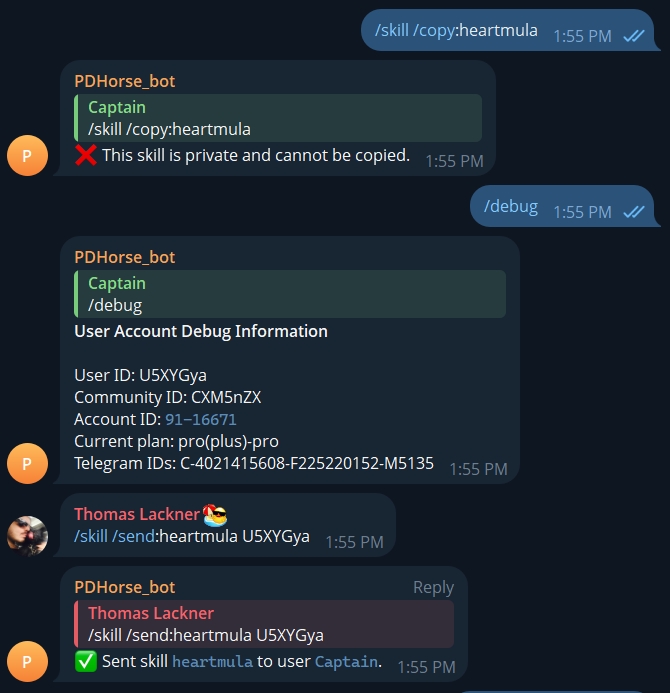
It’s possible with copy and send commands as shown below if you know a friend’s debug community ID code. Ask them to give it to you by typing /debug in their bog.
However, note that you can define privacy and open source to block these features.
Can I sell skills? (YES!)
We’d like to help people monetize their skills.
Plus members can set a price on their skills or make their source private. A skill with a price can’t be copied. Right now, you’ll have to find a way to transfer money from your buyer, and then use `/skill /send:skillname Uxyz123` to give them their own copy.
The customer’s user id can be found in their `/debug` output. If the skill you sell is open source, they will be able to improve it or sell their variant. We recommend open source skills for transparency.
Visit the Skills store for more information – click the link in the unified editor to manage your skills.