
Import your favorite workflow, run it anywhere
What are ComfyUI workflows?
ComfyUI is a desktop application that allows granular multi-step composition of AI images. An arrangement of those components, each called a Node, can be shared in what’s called a Workflow. You can upload those and use them in Stable2go or PirateDiffusion on our platform, on all of your devices, even on your smartphone or potato computer.Who is this tutorial for?
For most people, skip this tutorial and go enjoy the existing ComfyUI workflows already installed on your MyGraydient dashboard or in Stable2go — and start generating images effortlessly without having to set anything up.
We built this for technies and enthusiasts that want to take their ComfyUI workflows on the go and into their other applications. For example, you can connect a Discord Bot to our API and run Comfy workflows. There are a ton of use cases for developers.
What are some examples?
Graydient is hosting the top FLUX models like “Unchained”, and Stable Diffusion workflows. Video: How to use workflows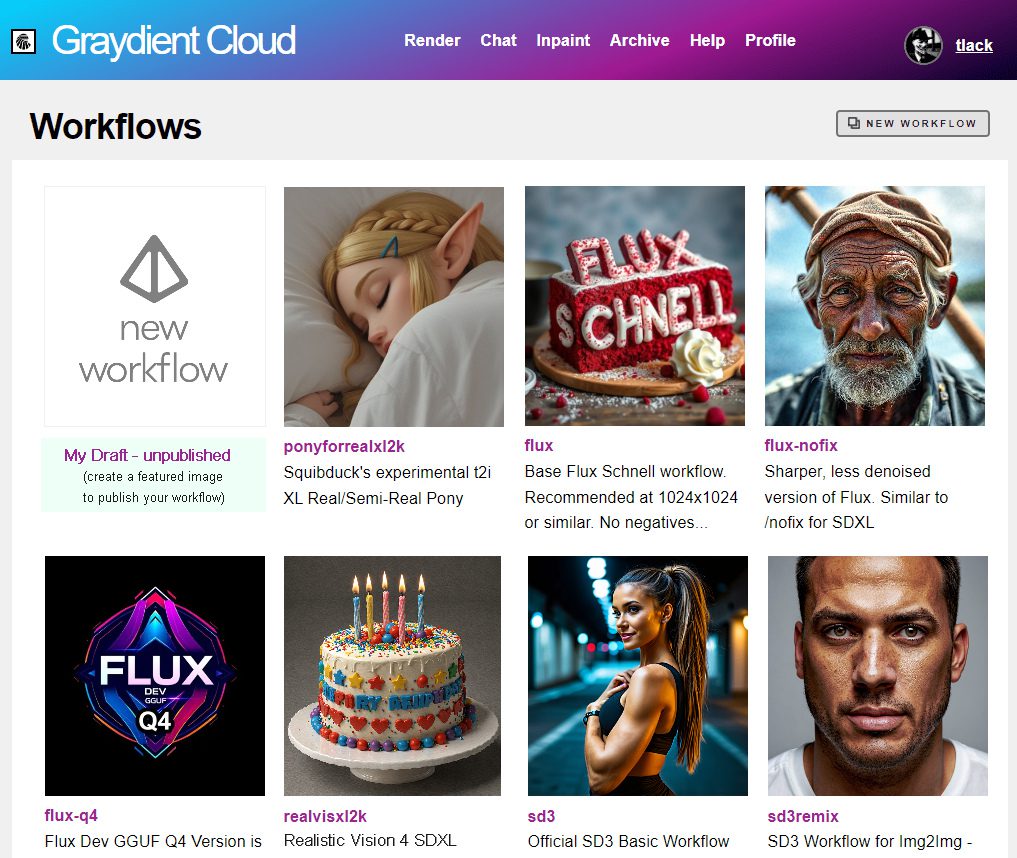
What can you do with workflows?
Workflows bring many kinds of functionality to your fingertips, such as the ability to automatically upscale images, remove backgrounds or watermarks, enhance prompts with LLMs, and more. Our integration makes it possible to enjoy your favorite ComfyUI workflows from any device, even your old smartphone!Can I create my own workflows from scratch?
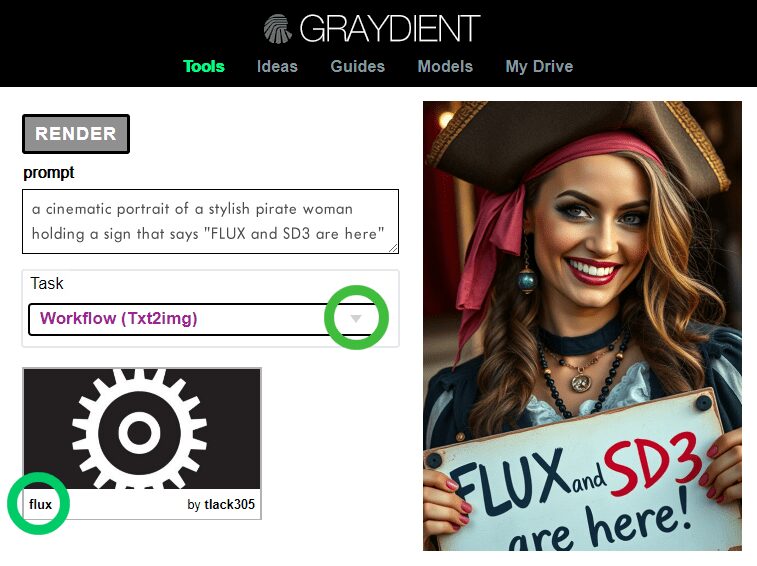
To be clear, Graydient is not a ComfyUI web hosting service, you cannot use it like on your desktop (we don’t rent servers by the hour). What we do is take your workflows and make it run via an API call, and within all of our web apps, so that even non-technical people can enjoy workflows (pictured below).
Can I download workflows from other sites and use them on Graydient?
Yes, but they require what is called Mapping — pairing the equivalent nodes to models and concepts native or unique to our platform. The idea is to “map” your ComfyUI Nodes to Graydient’s API fields. Pictured: For example, our API understands Samplers. In your workflow, it may be called Sampler_Name. We’re liking those. After you upload your JSON file, we provide a visual selector that gives you a bird’s eye view of your workflow, and provides point and click mapping functionality in your browser. There’s nothing extra to install in your ComfyUI Manager.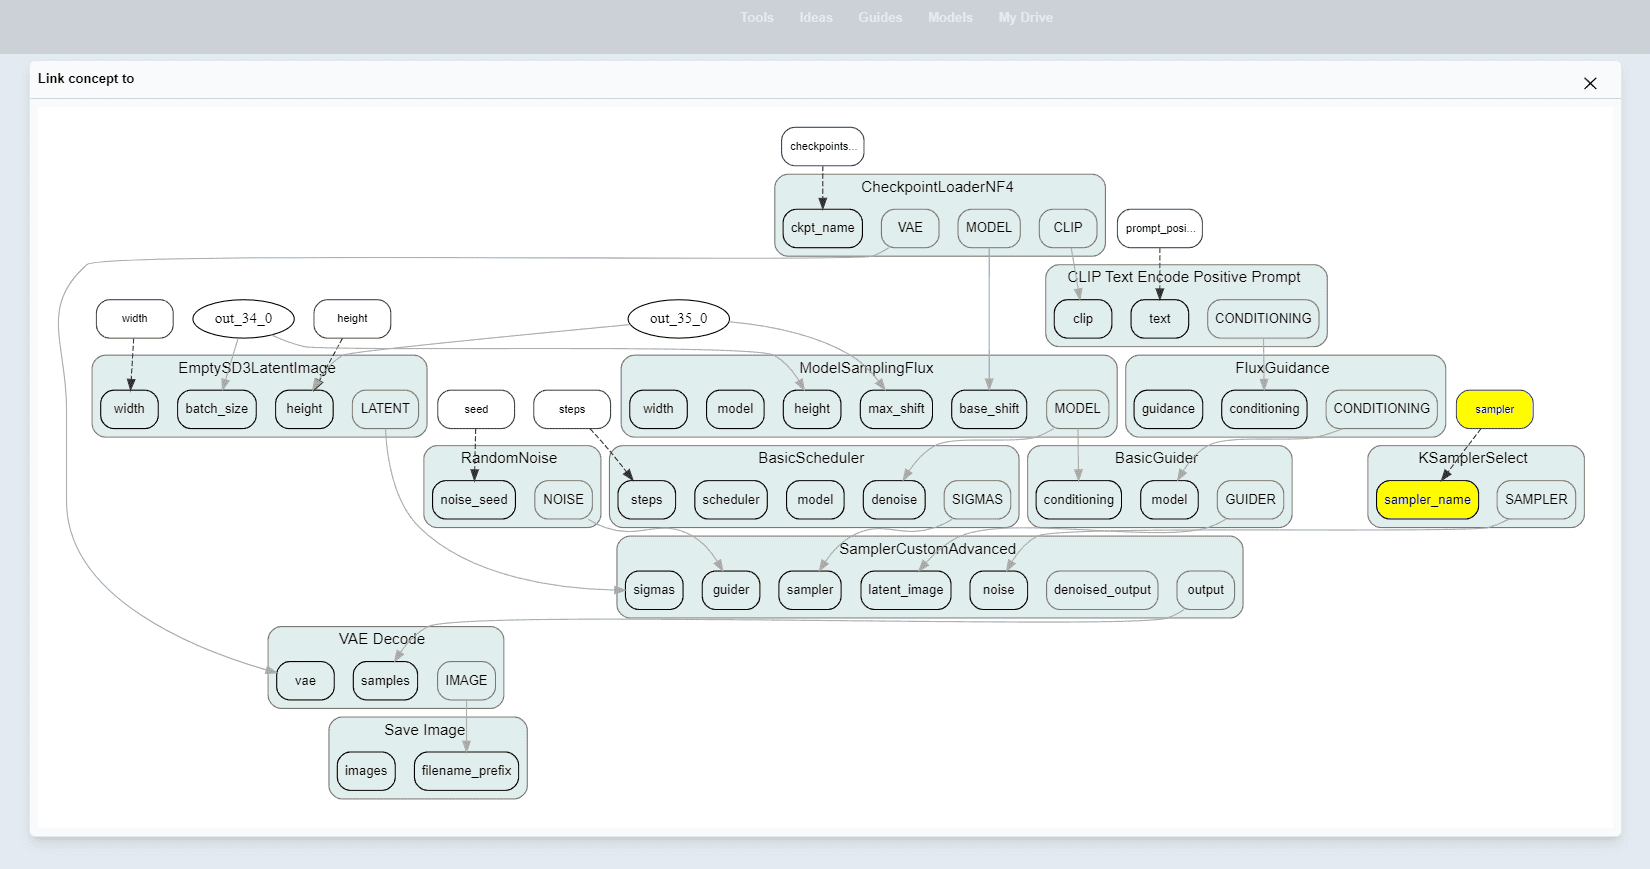
Uploading a Workflow to Graydient
Step 1: Prep Locally or via Remote Service
Graydient is not a GPU rent-by-the-hour provider, so you cannot use the ComfyGUI on Graydient. We may offer this sort of service down the line, but it is not available during the beta period. Our service is designed for unlimited use of a workflow after it is setup. As such, you’ll need to create your own workflow locally on your PC first, or on a third party like https://comfyworkflows.comStep 2: Open our Workflows manager
- Log on to your my.graydient.ai account
- Click on the Workflows & Recipes icon
- If the icon does not appear yet for your account, try this url
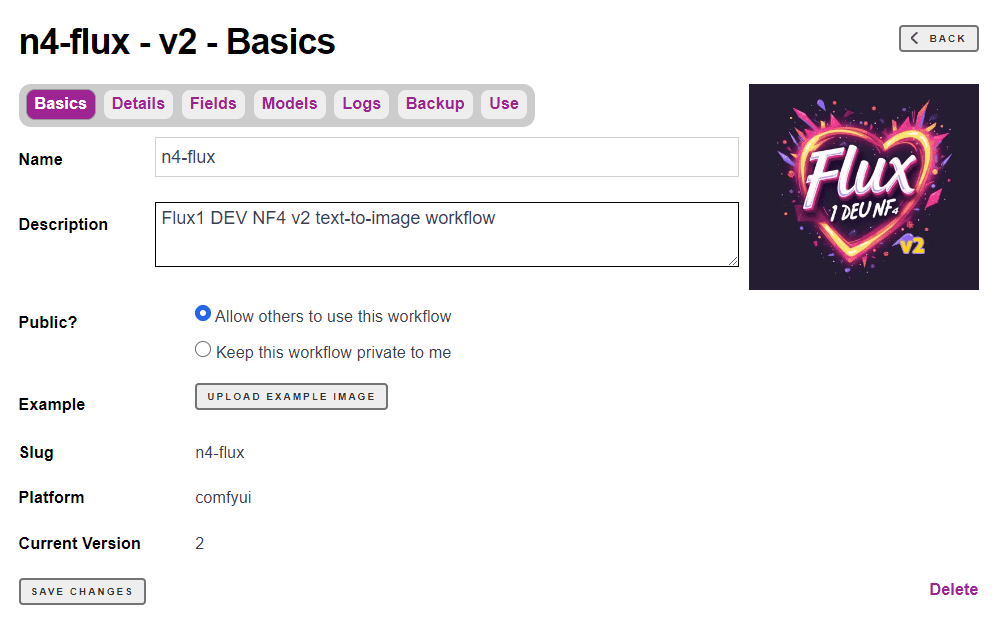
Step 3: Give it a name
- Click on the NEW Workflows button
- Change the name of your workflow and add your description if you want to
- You can make your workflows public or private
- Public makes it easier for the community to troubleshoot
Step 4: Adding your comfyUI workflows
Under your active comfyUI page, click on the gear button on the RHS side of the screen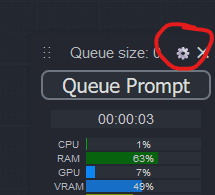
 Scroll down and check “Enable Dev Mode Option” if it is not already on.
A new Save (API format) button will appear under the Save button, as shown below. Click on this new button:
Scroll down and check “Enable Dev Mode Option” if it is not already on.
A new Save (API format) button will appear under the Save button, as shown below. Click on this new button:

- To save the primary workflow JSON file, check on the save button and fill in the name of the json file: workflow_name.json
- To save the secondary(API) json file, click on the save (API format) and save following this format: workflow_name_api.json.
- Check under downloads folder to find the following files

In this example, we have exported a worflow pair called test1

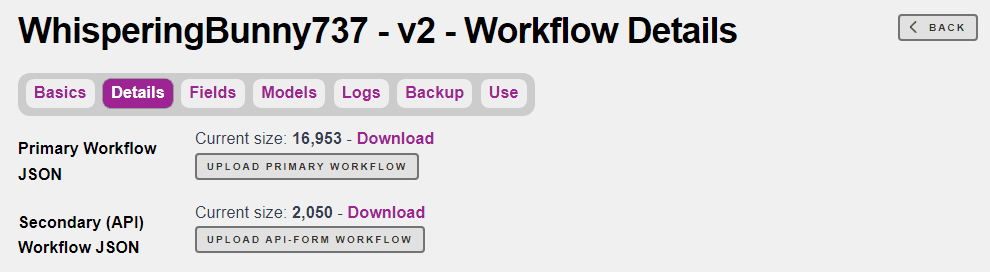
Step 5: Click on the Details tab
- Click on upload primary workflow and select the workflow_name.json file
- Click on upload api-form workflow and select the workflow_name_api.json file

Step 6: Click on the Fields Tab
Field mapping between Graydient platform field and comfyUI Node Input is perhaps the trickiest part of this step. The names may not exactly line up though many features are supported. In the case of zero-day nodes or custom nodes, you may need to work with our team to add support. We’re available in real-time over Telegram chat in your My Graydient dashboard to help you set this up. Take a look at the name of your Comfy nodes carefully, and map the names to the Graydient equivalent. The field names appear after you choose the node name. You are linking our available API fields to the equivalents in your Nodes, which may have similar names.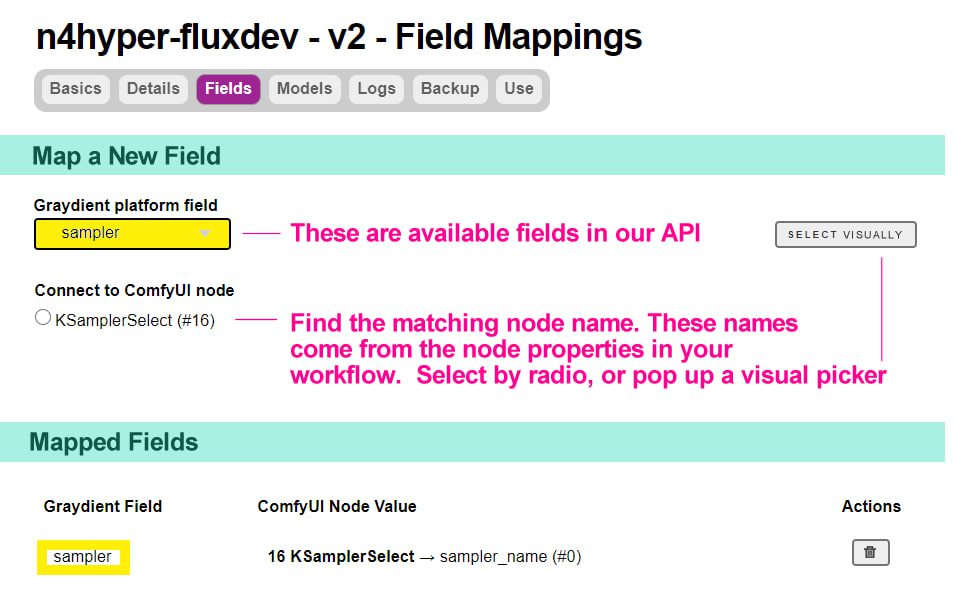 You can choose the matching radial fields, or click the “select visually” button for a bird’s eye view and click it there instead.
Troubleshooting: If your nodes do not appear, make sure that they can be downloaded via Comfy Manager. Custom nodes that aren’t part of the main Comfy Manager branch are not compatible at this time. Try replacing them with more commonly known nodes.
At the bare minimum, we recommend mapping Seed, Guidance, Height, Width, Sampler, and Steps.
You can choose the matching radial fields, or click the “select visually” button for a bird’s eye view and click it there instead.
Troubleshooting: If your nodes do not appear, make sure that they can be downloaded via Comfy Manager. Custom nodes that aren’t part of the main Comfy Manager branch are not compatible at this time. Try replacing them with more commonly known nodes.
At the bare minimum, we recommend mapping Seed, Guidance, Height, Width, Sampler, and Steps.
Common Field Names
| Default Node Names | |
| Guidance | KSampler > CFG |
| Num_images | Empty Latent Image > Batch_size |
| Prompt_positive | CLIP TextEncode (a number) > text |
| Prompt_negative | CLIP TextEncode (another number) > text |
| Seed | KSampler > Seed |
| Steps | KSampler > Steps |
| Width | Empty Latent Image > Width |
| Height | Empty Latent Image > Height |
| slot 1-3 | Slots are special fields used to map the sub_directory of combined diffusers SD15 Loader. You probably won’t need this, but it’s a common question we get. Its antiquated. |
Step 7: Click on the Models Tab
You can link to models remotely, or link to existing models already hosted by Graydient. Both examples are provided below:LOADING MODELS VIA URL
For remote URL models, we recommend uploading the safetensors file to Huggingface. You will want the final download file path as shown below.

Your mapping should look like this.

Write out the full name of the model in the checkpoint path as shown.
The destination folder is “checkpoints/” – you have to follow that with the actual filename, too.
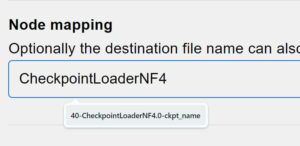
MODELS – NODE MAPPING
The most commonly occuring bug in setting up a workflow is not properly mapping the models. That’s why we built the Smart Suggest feature. When you click on the node mapping field, it will suggest the right node name. This is correct – notice how the suggested name and the field match: Example of a mistake – Notice how the name doesn’t match the detected name when clicking into the field.
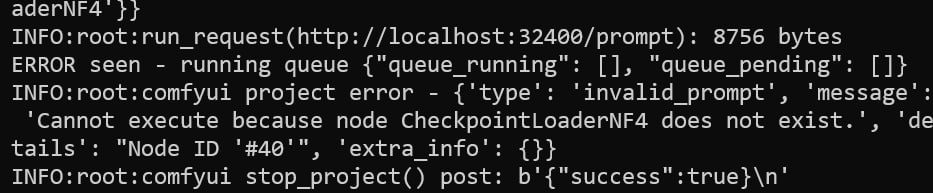
 When the file cannot be found, the workflow will not run and will display an error similar to this one:
Search for the model that you want to field map as shown below.
- In the case of SDXL and SD15 models,you can load an existing Graydient supported Diffusers (Huggingface) model/concept from https://cloud.graydient.ai/concepts

- Fill in the name from concept page using the exact short name
- Refer the example as explained below:

- For example, the Mistoon Ruby 3 Safetensors model is simply called mistoonruby3

- For save to destination path follow this best practice
-
- diffusers/SD15/mistoonruby3
- General: diffusers/SD15/model_name
- Once complete, click on the add concepts button
- Don’t forget to choose the suggested Node Mapping name. (Scroll up for a troubleshooting example)
Running your workflow
If you’re still in the editing screen, click on the USE tab. If you’re browsing our site, a render button appears on the workflows page. The USE tab has the Telegram shortcut, too.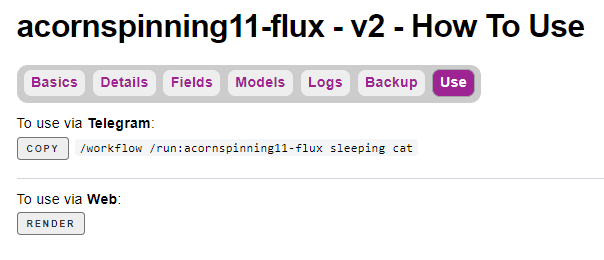 The task button in our WebUI has a workflow option. Your workflows will appear from the pulldown menu after they are saved. If it does not appear, try shift-refreshing the page to clear the cache. Example:
Running your workflow from Telegram
- There are 2 modes:
- Run – Runs the workflow and requires prompt
- Interactive – Only for debugging. Do not add a prompt, only the workflow name.
Run Mode
Write the workflow command, the mode, workflow name and then the prompt /workflow /run:whisperingbunny737 an airplane covered in pink fur Some PirateDiffusion parameters are available, like specifying /size and ((positives)) and [[negatives]] after you map them in the fields area, as exaplained in Step 6 above.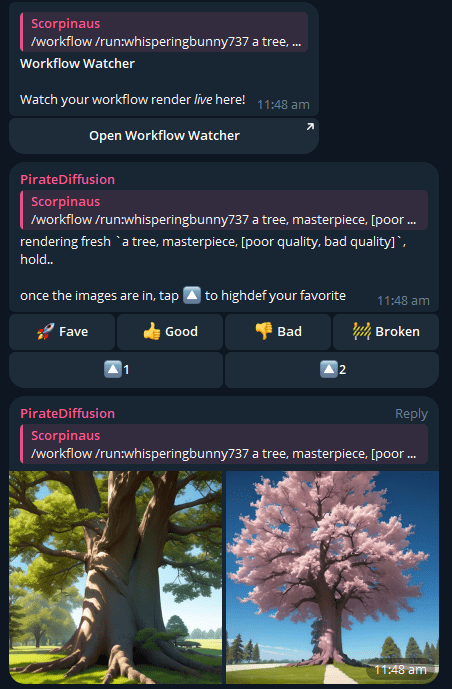

Interactive Mode
 Only add the workflow name, not the prompt.
Click on the open workflow watcher to render interactively.
When ready to render, you will see the comfyUI interface:
Only add the workflow name, not the prompt.
Click on the open workflow watcher to render interactively.
When ready to render, you will see the comfyUI interface:
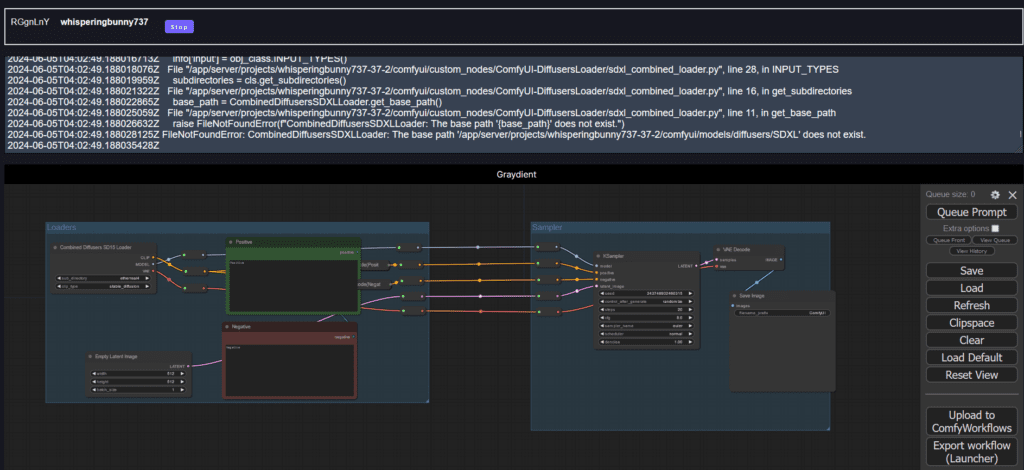 When using Interactive mode, click the STOP button to switch to another workflow.
Useful common remote URLs for models
These are some common files you may come across when mapping models. Check your workflow nodes to make sure they are applicable. unet/for-loras-fluxUnchainedBySCG_fuV1UnetOnlyFP8.safetensors https://huggingface.co/GraydientPlatformAPI/flux-unchained/resolve/main/for-loras-fluxUnchainedBySCG_fuV1UnetOnlyFP8.safetensors clip/t5xxl_fp8_e4m3fn.safetensors https://huggingface.co/GraydientPlatformAPI/fluxq4-workflow/resolve/main/t5xxl_fp8_e4m3fn.safetensors clip/clip_l.safetensors https://huggingface.co/GraydientPlatformAPI/fluxq4-workflow/resolve/main/clip_l.safetensors vae/flux_vae.safetensors https://huggingface.co/GraydientPlatformAPI/fluxq4-workflow/resolve/main/flux_vae.safetensors Best SDXL VAE with 16-Bit Correction (made by olin) https://huggingface.co/GraydientPlatformAPI/bright-vae-xl/resolve/main/sdxl_vae.safetensors Various ComfyUI-compatible Upscalers in .safetensors format https://huggingface.co/GraydientPlatformAPI/safetensor-upscalersExample Workflows
Download these PNG files contain the JSON metadata within their EXIF. Load or drag these graphics into ComfyUI to see their nodes.Stable Diffusion 1.5 – Text2Image
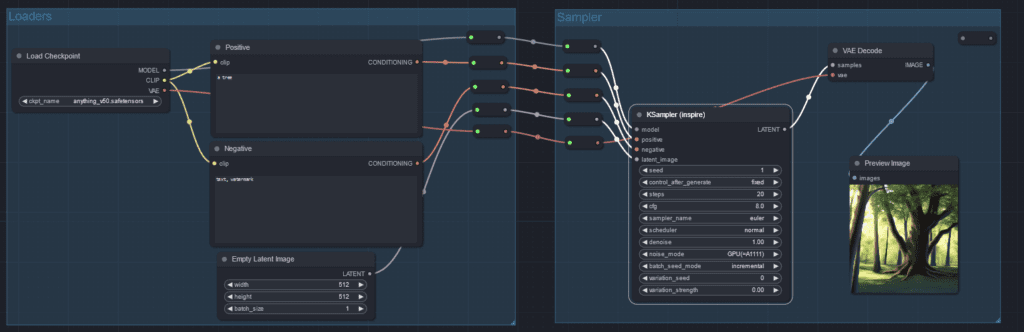
Stable Diffusion 1.5 – Img2Image
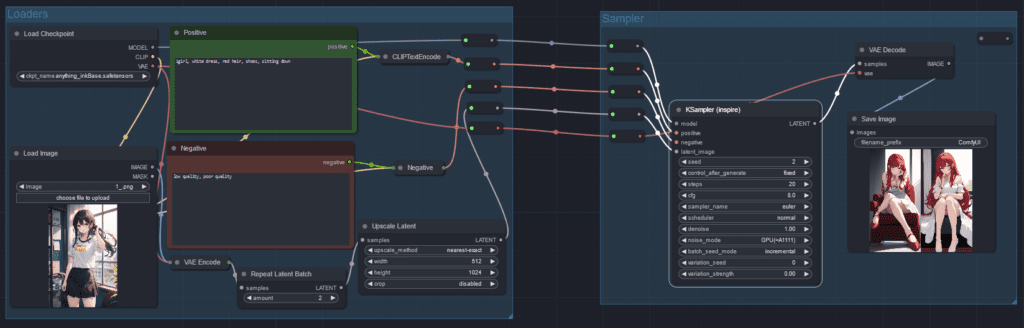
Stable Diffusion XL – Text2Image, no Refiner

Stable Diffusion XL – Text2Image, with Refiner On
Remove Background

- Image Remove Bg : Takes the input image and removes the background from subject using RMBG1.4 model
Image Upscaler By Model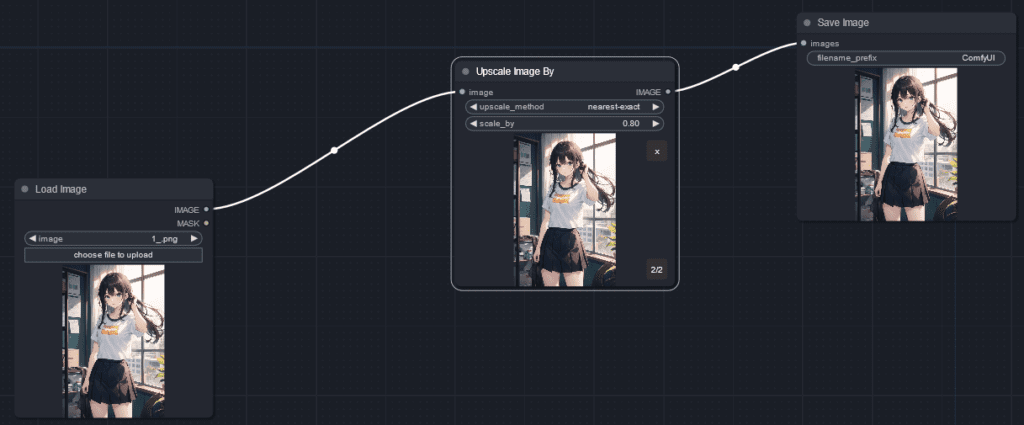
This is a simple workflow that loads in an image and outputs an upscaled image using an upscale model. This is available under graydient workflow name: (workflow name)
There are the crucial nodes involved:
- Load Image: Loads the image where you want to remove the background from a specific object
- Load Upscale Model: Loads the upscale model (usually in .pth format) to upscale your image
- Upscale Image By: This determines how much your image will be upscaled by.
- 0 – 1 -> Downscales the image
- >1 -> Upscales the image.
FAQ and Troubleshooting
Comfy node or prompt not found error This means one of your components isn’t mapped properly, or the component cannot be found in Comfy Manager. If the node is part of Comfy Core and is an old version or a brand new version, that’s likely the issue. Replace it with a more common equivalanent and double check the node mapping and field mapping. Model is corrupt Replace your .picketensor files such as .pt files, replace or convert them. We’ve linked many common VAE and Safetensor types above for your convenience. If the file is safetensors, try uploading your known working copy to a fresh Huggingface folder and right click on the “download anyway” link as pictured in the instructions above, not the “blob” url path type that is given on the folder view. The image renders in prompt watcher, but doesn’t appear, or appears many times Preview nodes are the cause. Delete all of the preview nodes and replace them with one Save Image node.What’s next?
 Join us in VIP chat in your My.Graydient dashboard and join the Workflows discussion topic to join our workflows developer sharing community.
We’ll update this page as more features are introduced. Happy rendering!
Join us in VIP chat in your My.Graydient dashboard and join the Workflows discussion topic to join our workflows developer sharing community.
We’ll update this page as more features are introduced. Happy rendering!